


Vocal chops… they can make or break a song in modern electronic music.
But how do you make them? Do you just use samples, or do you chop your own vocals?
In this guide, we’re going to be looking at how to create vocal chops in any major DAW using an acapella sample. You’ll need:
- FL Studio (Slicex) or Ableton Live (Simpler)
- A nice acapella (I’m using this one here which is free to download, but feel free to grab one from another vocal pack)
- A few minutes of spare time
Alright! Let’s get to it! 👇
Table of contents
Step #1 – Find a Section
Although this whole acapella sounds nice, we don’t want to use it all.
If you use too many different vocal chops, it’s going to sound horrendously messy. Instead, let’s find a section that has a few different pitches and/or vowels.
I chose a two phrase section as you can see in the image below. Feel free to use the same section or something different.
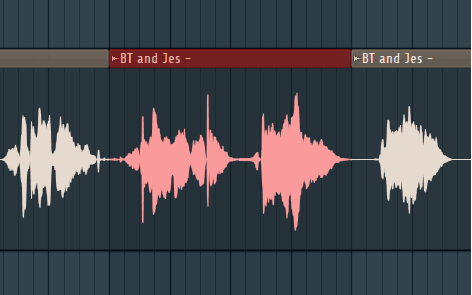
Why did I choose this particular section?
First of all, I like the differentiation in pitch and timbre during the first phrase. There’s enough to cut from just this section.
Second, I admire the vocal effect that’s been placed on top. This opens up a lot of room for creativity and also provides a unique sound (as opposed to a dry vocal sample).
Great, let’s move on to the next step.
Isolate and Make Unique as Sample
The next thing we’ll want to do is get rid of the surrounding audio from the acapella (we don’t need it for our vocal chops and it’s good to keep things organized).
We want to ‘bounce’ or ‘consolidate’ our sample so we can easily open it with our tool of choice. Here’s how to do that in both FL Studio and Ableton Live:
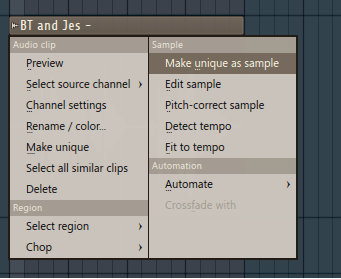
FL Studio: Make Unique
Click on the top-left drop-down list inside the audio clip, and underneath Sample click Make Unique as Sample. It will then ask you to save it somewhere, by default, it will save in the same place as your acapella.
Note: If you get a dialog box that reads “This clip is not used anywhere else…” click yes and continue.
Ableton Live: Consolidate
In Ableton, it’s a little more straightforward. Simply click and drag the section of audio you want to isolate and hit Cmd + J (or Ctrl + J on Windows).
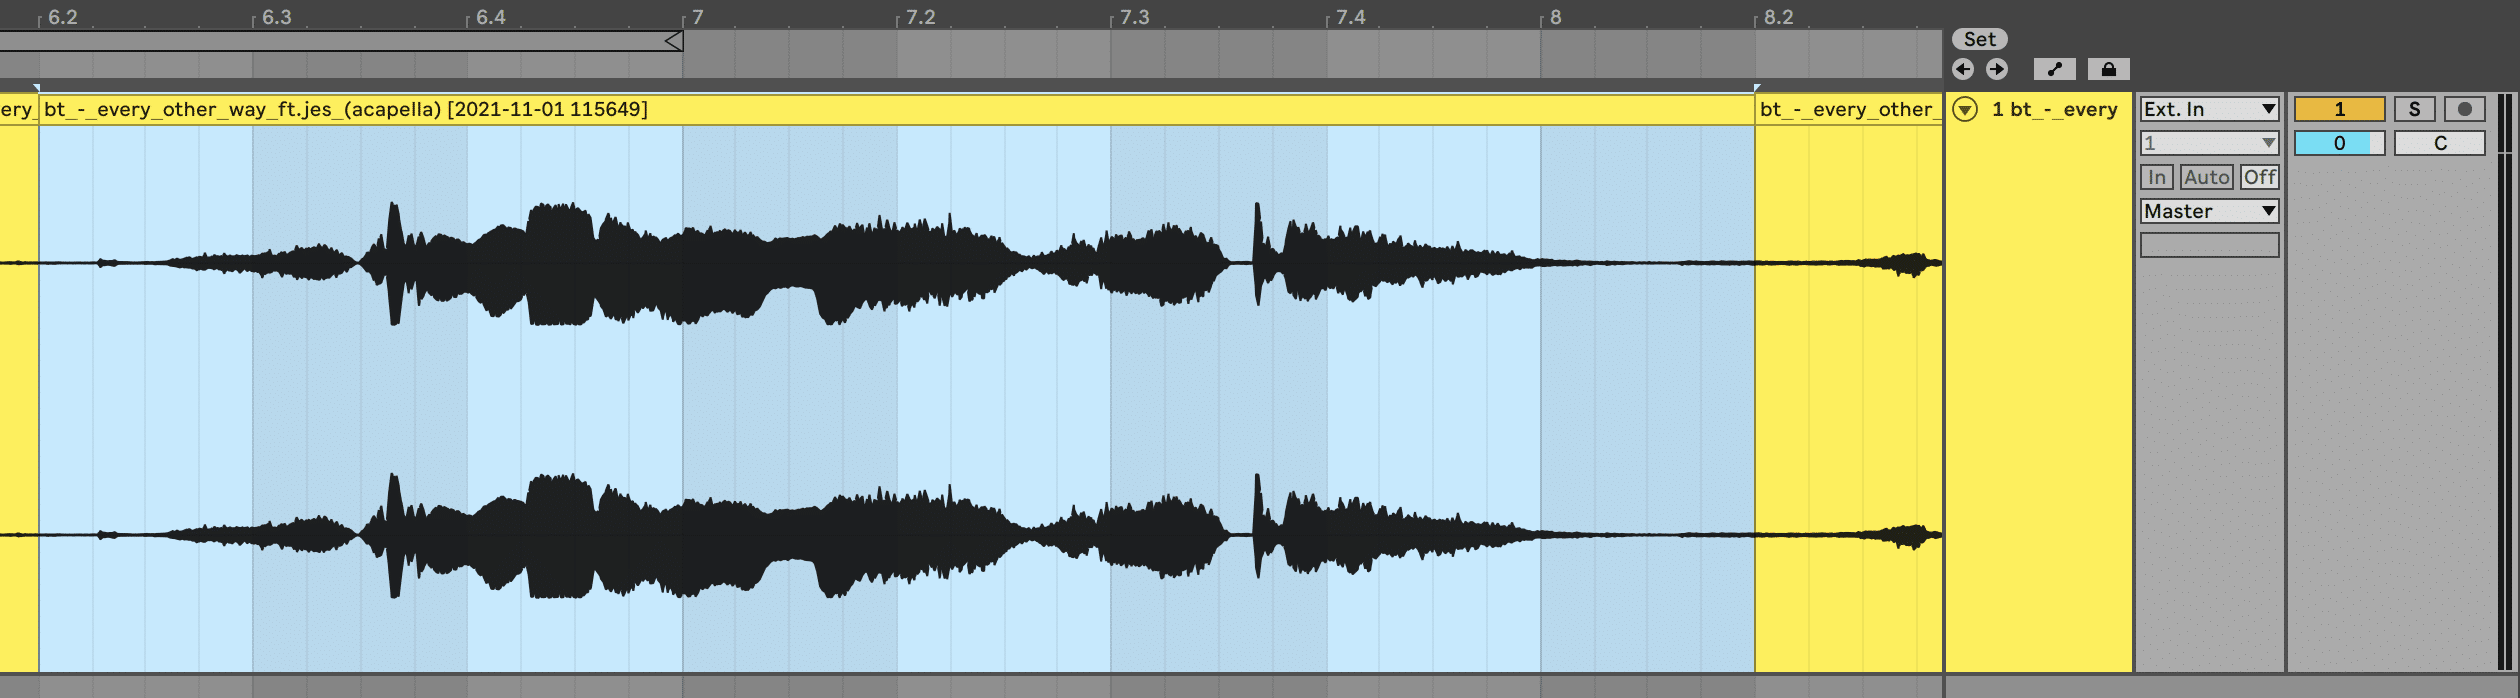
This will create a new audio sample, so you can click the other parts of the original audio clip and delete them.
Step #2 – Slice Up Your Vocal
Okay, we’re starting to make some progress! Let’s put the ‘chop’ in vocal chops.
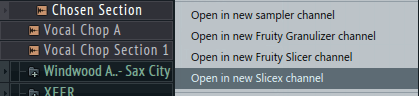
Following along in FL Studio? Head to the browser and find the acapella section that you just made unique.
Right-click on this and select ‘Open in new Slicex channel’.
If you’re in Ableton Live, simply just create a new MIDI track with Shift + Cmd + T (or Shift + Ctrl + T).
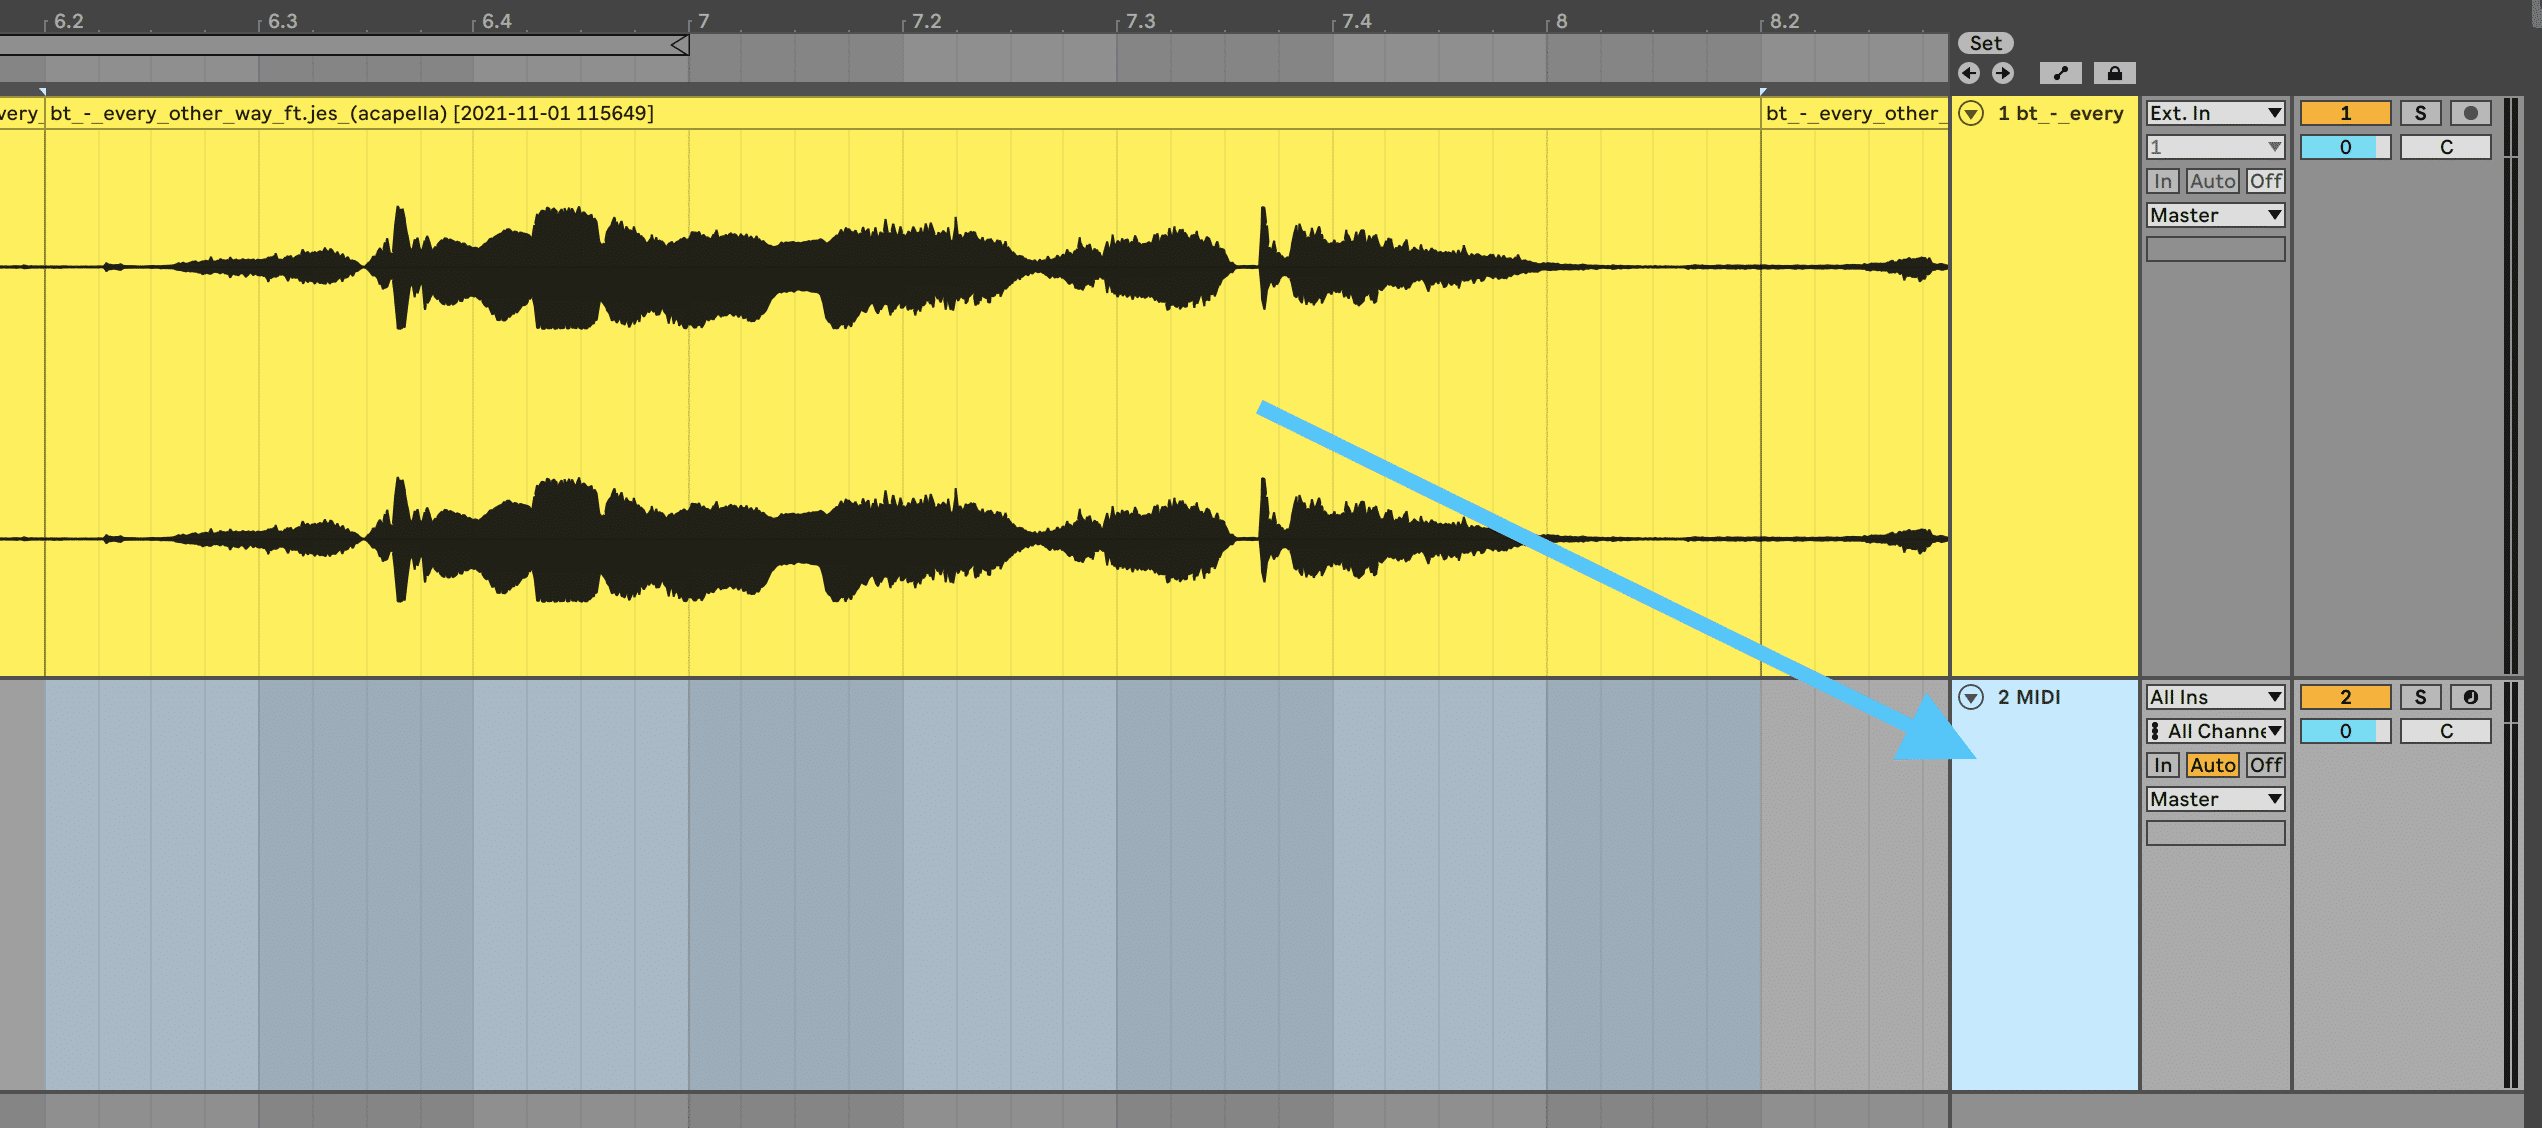
Then, just drag that consolidated sample right in.
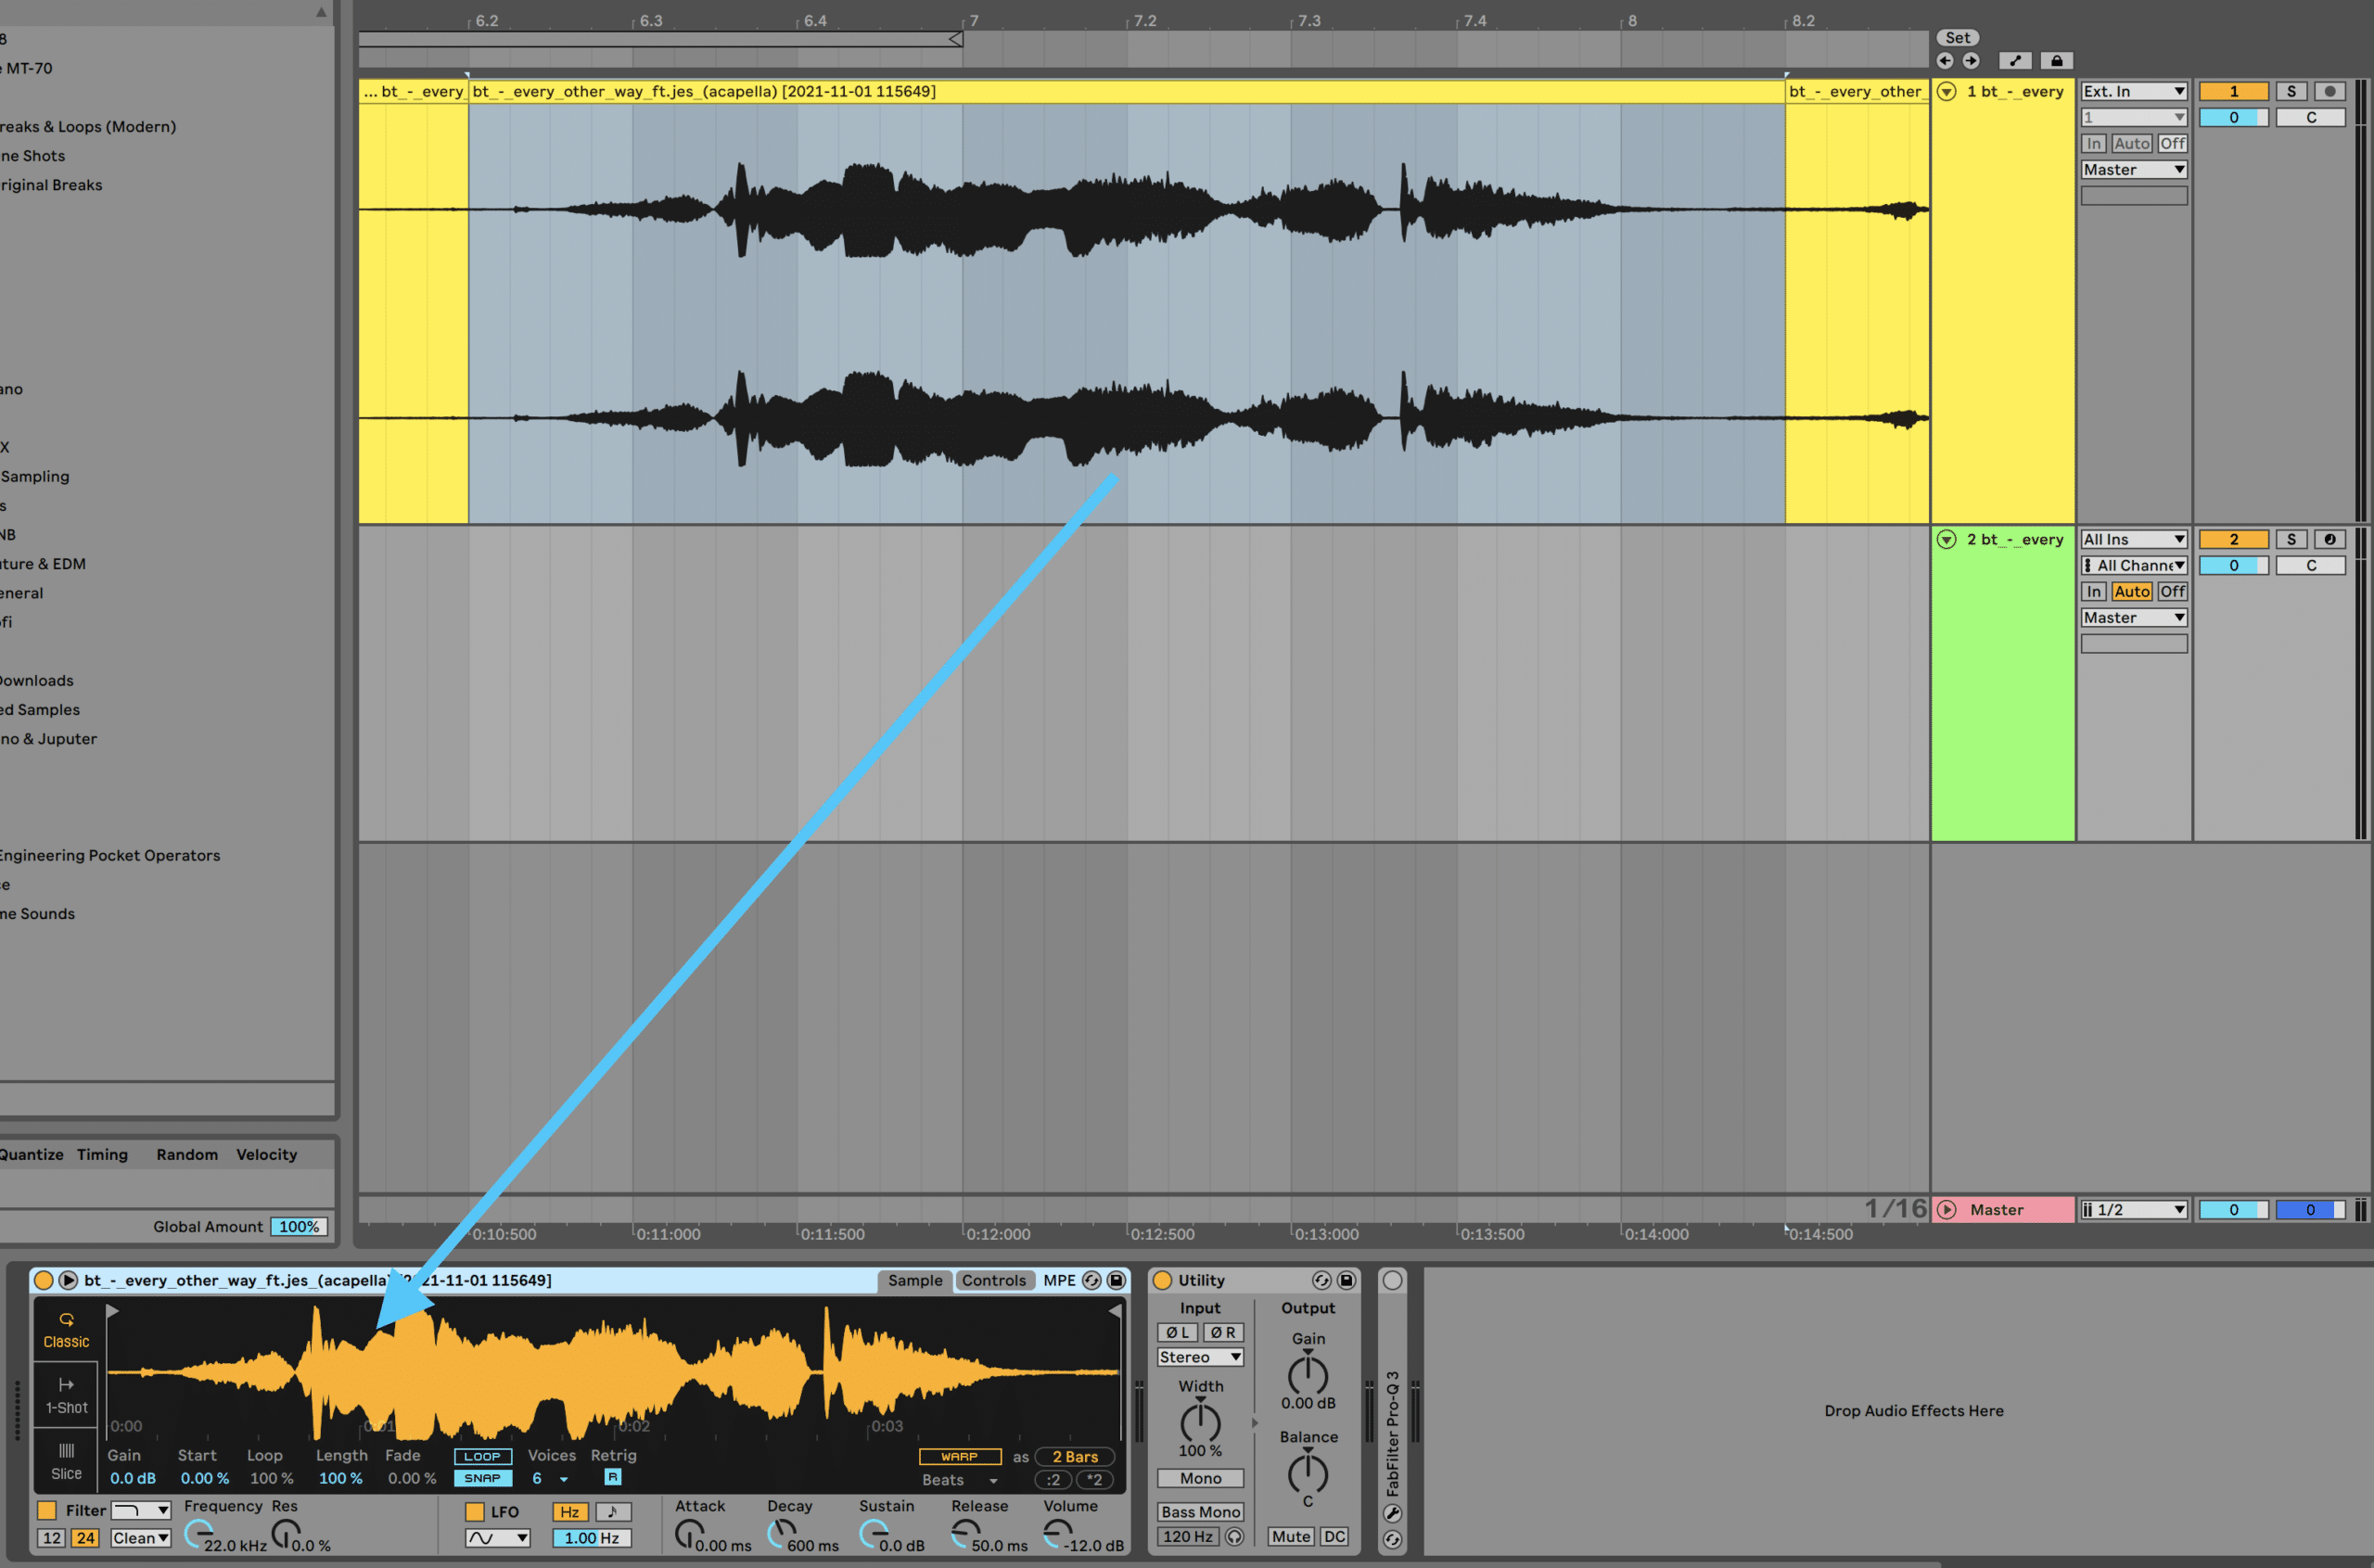
Editing Chops
Straight away we’ve got some vocal chops created that can be played with our keyboard or organized in the piano roll. Let’s start selecting our chops, starting with FL Studio.
Chopping in FL Studio
I’m going to delete the parts I don’t like and move some markers around until I have some nice vocal chops. Note that this takes a lot of trial and error and it’s completely done by ear. This stuff takes time!
- Marker #1 & #2 I don’t want because they’re just breath samples. While this kind of sound can work absolutely fine, it’s not what I’m after. I right click on the two markers and delete them.
You’ll notice now that all the markers have been renamed, so marker #1 is now in a different place.
- I’m not a fan of the chop at marker #1, and after moving it around the section a little I find that it doesn’t appeal to me, so I delete marker #1.
- Now marker #1 has moved over to the next slice, I like where this is and think it’s perfect, so I leave it.
- Marker #2 is also really nice, and I leave it where it is.
- I move marker #3 over just a tiny bit as it was in between the middle of two different words/pitches and sounded a little weird.
- I delete marker #4 & #5 as I don’t like the sound of them. Then I move the new marker #4 over to the next grid-line.
4 vocal chops seems like enough, and I’ll have to leave it there otherwise I’ll spend days writing this post!
I deleted all other markers after marker #4 to clean things up, here’s how it looks:
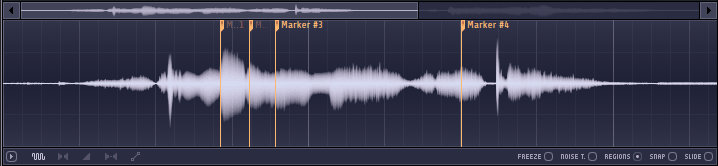
Note: the image above is zoomed in, therefore you can’t see the rest of the section we cut.
Chopping in Ableton Live
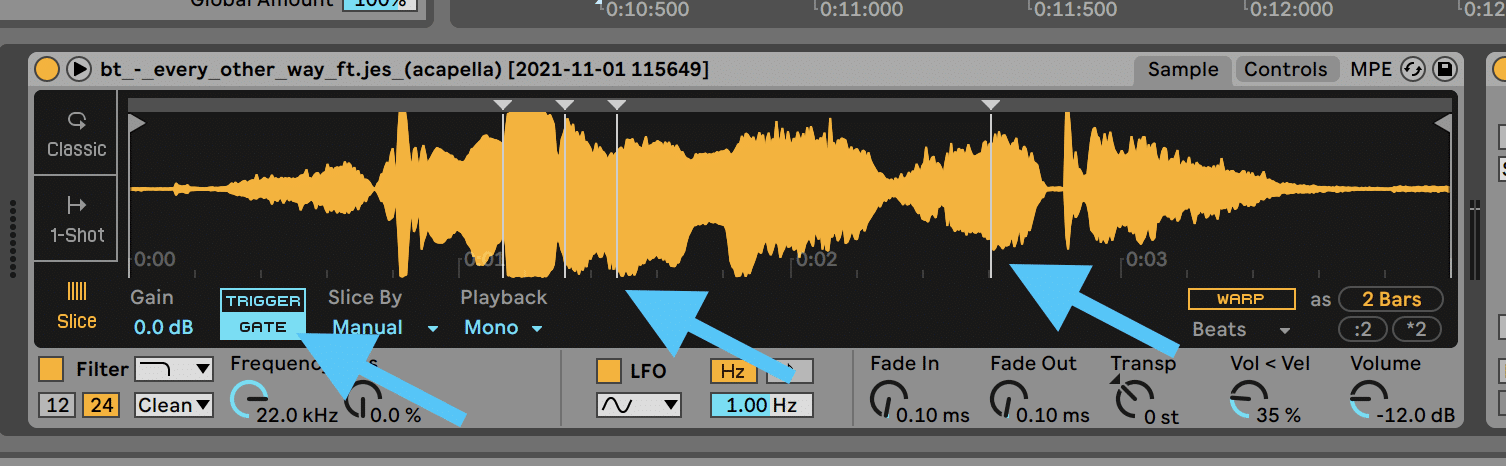
If you’re in Ableton Live, you can replicate this by selecting the Slice mode in your Simpler:

Now each keyboard note corresponds to a chop, starting from C1. But as fun as the default slices can be to jam around on, let’s select the manual slicing mode instead.
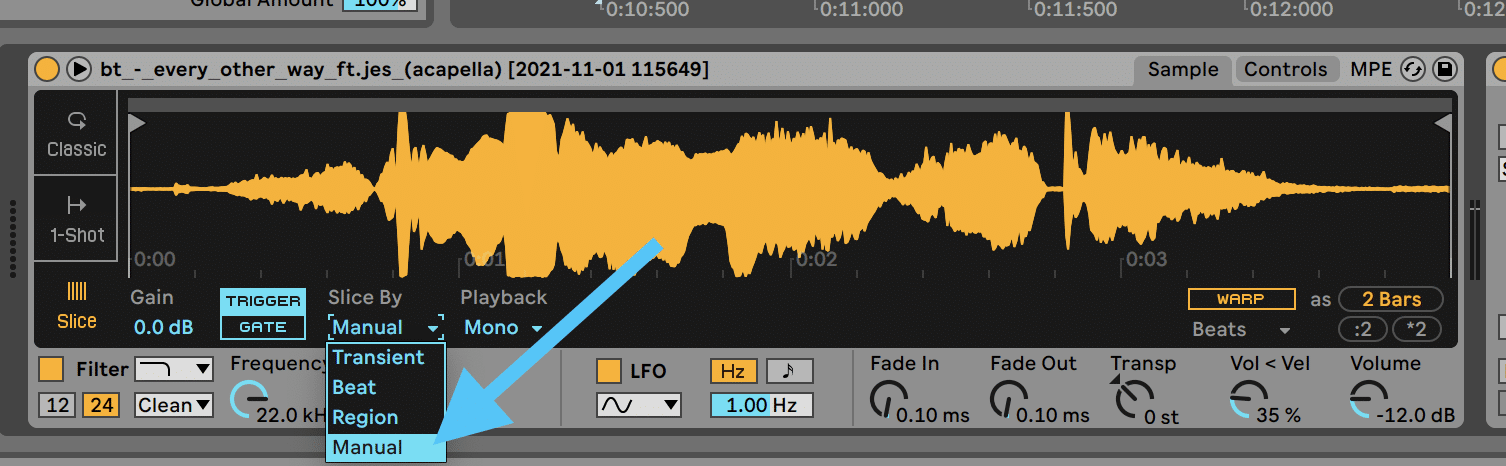
Let’s replicate the above image from FL Studio by double-clicking at each point, creating 4 markers. Make sure to switch on ‘Gate’ so that the note doesn’t play out the full phrase:
Now we’re good to go!
Recommended: How To Sample Music
Step #3 – Making a Vocal Chop Phrase/Melody
So we’ve got a total of 4 different chops, all sounding slightly different. I’m not going to tell you how to write your vocal chop line, simply experiment. Let’s program in some notes to make a chop phrase.
From now on I’ll be mostly sticking to FL Studio, as the process is essentially the same in Ableton Live’s piano roll.
Go into the piano roll in your DAW and go crazy. Here’s what I came up with if you want to follow along:

The rhythm and selection of chops for each note is crucial, so don’t rush this. Keep experimenting until you’re happy with the result.
Here are a few tips:
- Less notes is more – try not to fill each gap with a note
- Create a few variations to see which one you like the best
- Try a longer phrase length – while repetition is good, longer phrases (e.g. 4-8 bars) give us more ways to add subtle variation
- It can be fun to change the chops after you’ve programmed your notes to see what cool results you can get
Adding Extra Notes + Velocity
It’s sounding okay at the moment, but I want it to be a little more dynamic and interesting.
I’m going to add a few more repetitive notes with much lower volume/velocity in between some of the chops that are already there:
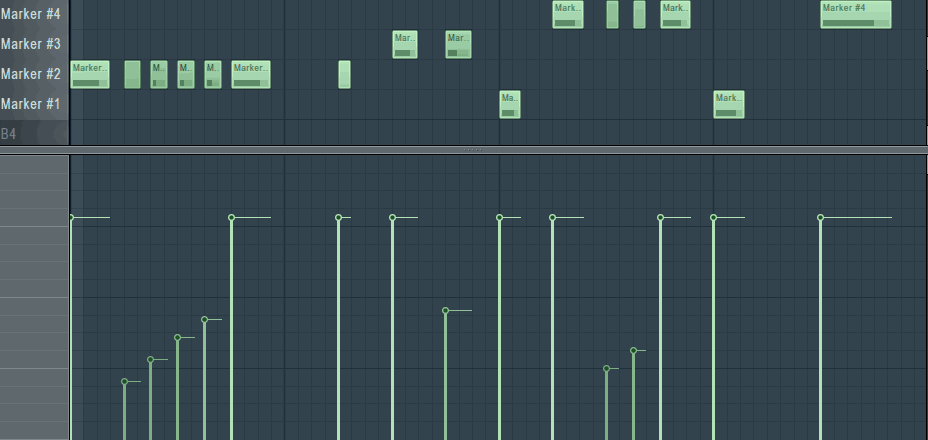
This really spices it up a little and makes it sound more ‘trance’ like. Feel free to experiment with different velocities and note placements depending on your genre and context.
This is starting to really take shape, so let’s polish it off with some effects processing.
Recommended: The Ultimate List of Every Single Remix Competition
Step #4 – Adding Effects To Your Vocal Chops
There are so many different types of effects you can add to vocals to spice them up.
The best part is, the way you process vocals can become integral to your sound as a producer. So feel free to spend a bit of time here to figure out what you like.
To start, try playing around with the following effect types:
- Reverb to put your vocals in a space
- Delay to create nice long tails, blending into the mix
- Chorus to widen and thicken them up
- Distortion to add grit and dirt to your clean samples
- EQ to mangle the frequencies in your sample
- Pitch shifting and time-stretching to create out-of-this-world sounds
- Layering octaves to give your vocals power and fullness
In this case, I’ve added is a bit of reverb & delay as well as filtering at around 200Hz:
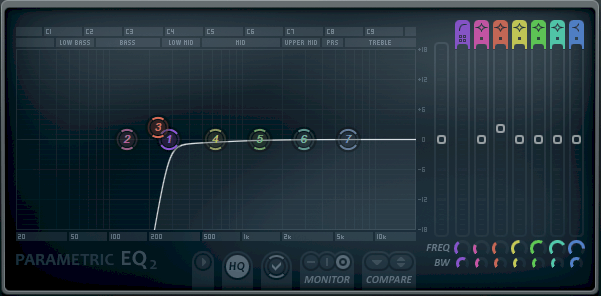
You might want to add these to a send track to keep things cleaner – this was just a quick job.
As you can here, this is a more conservative approach to vocal processing, but it suits the trance context I’m going for.
For example, if you’re making future bass, you might play around with distortion, chorus, and pitching more than me.
Lastly, consider the effects that might already be baked into the sample. If your original sample already has pitch shifting, then adding more might create some weird artifacts. Which could be good or bad depending on the context.
That’s it! Now you’ll probably be wanting to find your own vocal samples, so let’s see where you can find some.
Where To Find Vocal Samples To Chop
There are great options for both paid and free vocal samples out there. I’d recommend a service like Splice Sounds (you’ll get a free month when you sign up for some our courses) to find consistently good sounds to play around with. Especially because there is so much to choose from.
Here’s a full list of options:
- Splice Sounds (Paid) – our recommendation for the best quality vocal samples for vocal chops (sponsored link)
- Noiiz (Paid) – a great service similar to Splice Sounds
- Freesound.org (Free) – full of individual vocal samples that you can download and mangle
- SampleSwap (Free) – you can grab full packs of vocals (as well as other sounds) on this great site
- Acapellas4U (Free) – a great resource for professional acapellas, just be careful of potential copyright issues with commercial samples
- Vokaal (Paid) – the prefect site if you’re looking for entire, 3min-long performances
If you’re after more free samples, check out our massive free sample packs list, or our EDM Starter Kit below!
What About Creating Vocal Chops Randomly?
For now we’ve covered way to precisely create a melody you have in your head.
But what if you don’t know what you want? But you know you want to add some “vocal” character?
Enter my favorite technique. I call it the Vital Randomizer 👀
For this, you will need to have the Vital synth. It’s free and absolutely awesome so you should definitely grab it:

First, we need our acapella. This is the one I am going to use:
Next, I am going to start with a blank preset. De-activate all 3 oscillators, and enable the Sampler. This is where I will drag in my acapella:

Next, enable the “Sample Random Phase”. This will trigger the sample at random points on every note:

Next, draw in a series of C5 notes in your piano roll. You can experiment with different patterns here.
Next, I am going to to add some FX within Vital. I’ve gone for some heavy compression first to bring out some brightness, Then I’ve added some chorus, delay and reverb:

Now, all you have to do is record! Playing this several times, this is the full recording I have:
Now, all I have to do is isolate a section I like. In my case, I really liked this little part here:
Notice how I changed the selection at the end of each phrase. This is to create a turnaround:

You can even go one step further.
Let’s say our track is in G minor. You can tell Vital to play random notes in that scale! First, find a pluck sound that you like (either in the presets or that you design yourself).
I’ve designed a simple pluck from scratch:

Next, we want to enable so notes from our key. I’ve picked the notes D, G, A and Bb in my case:

Finally, we are going to create a random sequence. For this, go to Rand 1 modulation and select Sample and Hold. Then, drag it to the pitch of Osc 1:

Finally, draw in a series of C notes in your piano roll. Vital will randomly select notes from your key!
Nice!
Now, all you need to to is select a section that you like, just like we did with the vocal. You can even layer the two together!
Now It’s Your Turn
Vocal chops are an awesome way to invoke an emotional response and leave an impression on your listeners.
So now that you know how to create them, what are you waiting for? Grab some vocal samples and get chopping!
But seriously, experiment with different acapellas. Layer them, chop them, and process them – go wild!
