An LFO is one of the most common tools used in sound design. Load any preset in your favorite synth, and there’s probably one active.
LFO stands for Low-Frequency Oscillator. And it’s what gives our tracks movement and variation.
With LFOs, you can modulate any parameter of your choice. Which makes it an extremely powerful weapon in your arsenal!
So in this guide, we’ll cover everything you need to know. Specifically, we’ll look at:
- What an LFO actually is
- How it work under the hood
- The basic parameters of an LFO
- How to set up LFOs in Ableton Live and FL Studio
- The best use cases for LFOs
So without further ado, let’s dive in! 👇
Want Serum presets that work out of the box?
Download our FREE EDM Essentials for Serum preset pack with 60+ high-quality sounds – from soaring leads to smooth pads. Suitable for any genre, style, or sound.
Table of contents
So… What is an LFO? 🤔
First, we need to do a quick refresher on oscillators.
An oscillator is an electronic signal that oscillates at a certain frequency. This in turn produces a sound.
Classic oscillator shapes include the sine wave, square wave, and triangle wave:
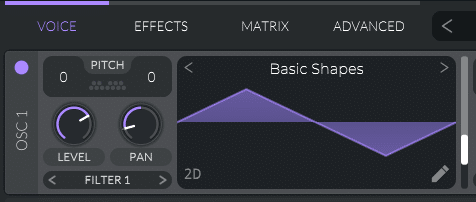
Oscillators “repeat” at a frequency between 20 Hz and 20,000 Hz. The speed at which they repeat determines the pitch we hear:
Now, what happens if you go below 20 Hz?
Below 20 Hz is where we cross the human hearing range. We cannot perceive sounds with a frequency below 20 Hz:
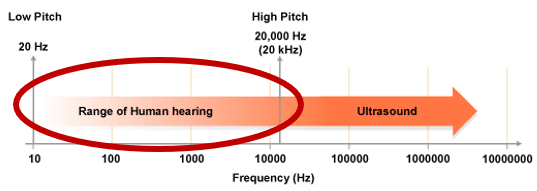
This is precisely where LFOs come in. It stands for Low-Frequency Oscillator.
LFOs are generally below 20 Hz, meaning we can’t hear them. But if we can’t hear them, what are they used for?
They are used to modulate other parameters.
This could be volume, pitch, panning, or anything else. Because the LFO movement is so slow, this creates a sweeping, pulsing effect.
Modulations, and Why You Should Use LFOs 👊
Modulations let you change a parameter over time. They work with 2 components: sources and destinations.
The source is a signal or value that is used to affect a parameter of a synth.
In this case, our source is a low-frequency oscillator or LFO. Here I will pick a sine wave LFO, with a frequency of 2 seconds:
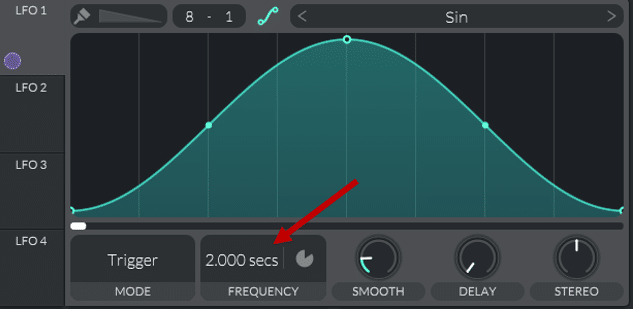
On the other hand, the destination is the parameter we want to modulate.
Here, let’s pick the panning:

This is what we get:
Our sound is panning now panning from left to right!
You can start to imagine the power of LFOs. Once you get familiar with the mechanics (more on that later), you can modulate anything you want.
The reason for using them is simple: movement.
LFOs inject change and rhythm into our sounds. Let’s look at an example:
There’s another reason why LFOs are such a powerful tool.
You can use an LFO on pretty much anything.
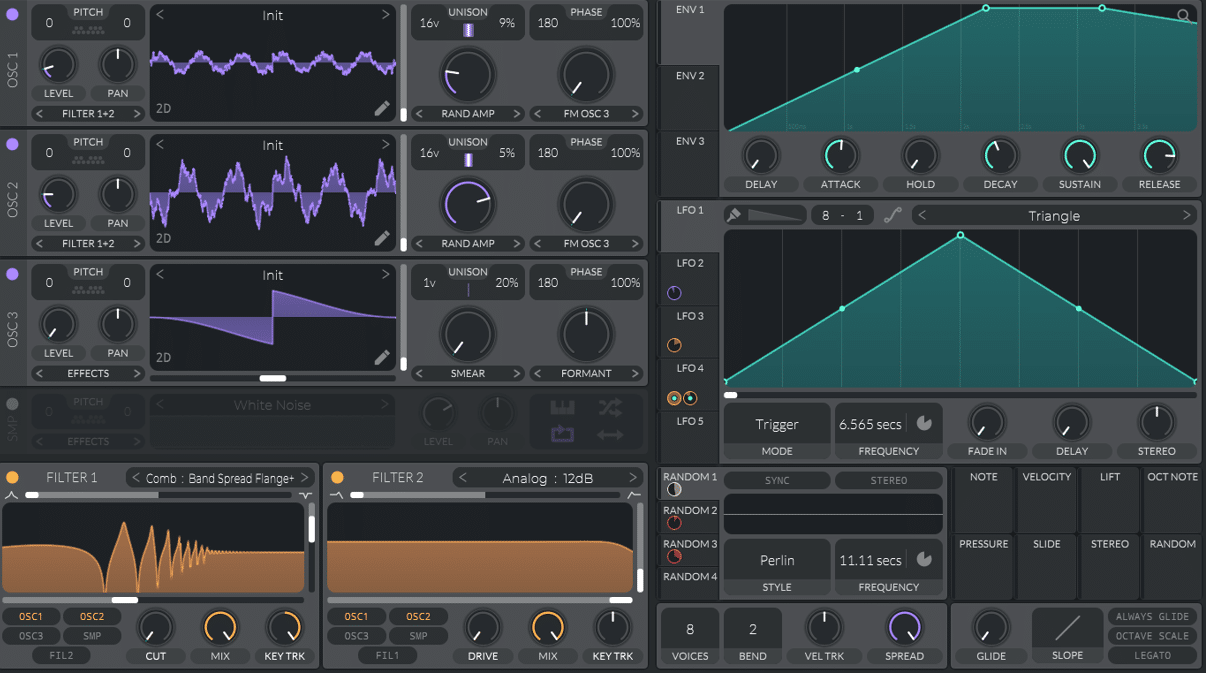
You can even use them to modulate the speed of another LFO! For me, learning about LFOs was a bit like the first time I used automations. Once you understand how they work, a world of possibilities opens up.
Parameters of an LFO 🎛️
Next, let’s cover the most essential parameters of an LFO. Some of these parameters are common to all. But others vary depending on the synth or effect plugin you use.
Shape
This parameter is also called “shape” or “waveform”. This is where you decide how your LFO will oscillate.
The most common shapes include sine, triangle, square, pulse, and saw:
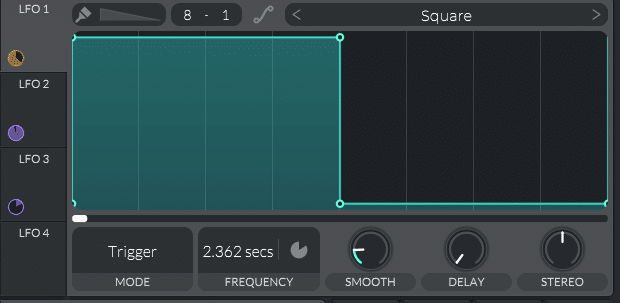
Each wave will change how your sound is modulated. Let’s check it out.
First I will use a sine wave shape to modulate the cutoff of a filter. Then I will use the exact same settings, but switch the shape for a saw:
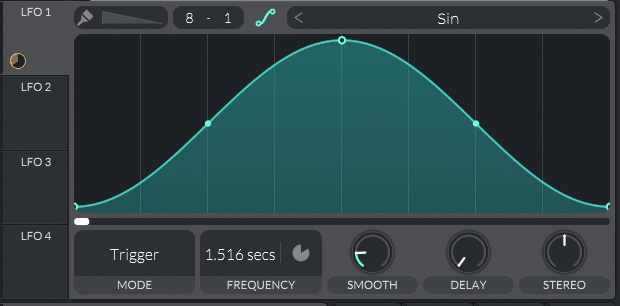
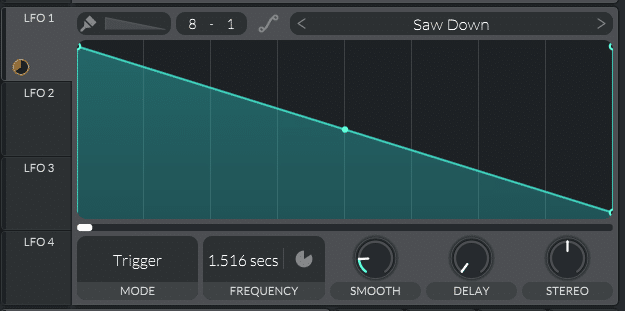
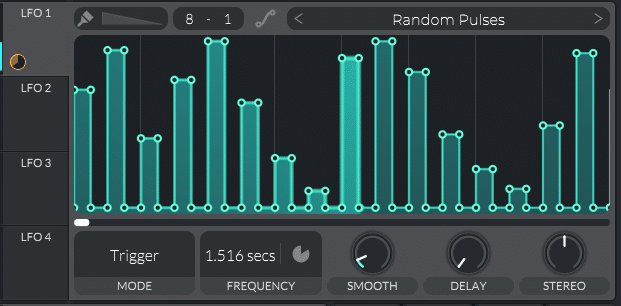
In some synths (such as Vital and Serum), you can even custom-draw your own shapes. This can lead to some really wacky modulations:
Looking for the best free preset sample packs for Vital and Serum? We have you covered here and here 🙏
Rate
Sometimes called frequency, this is basically the speed of your modulation.
Choosing the speed of your LFO is crucial to the sound you want.
With a low speed, your parameter will be changed slowly over time. A higher rate will create a more rhythmic feeling.
The rate can either be set in Hz, seconds, or in tempo division.
Amount
The amount can also be called “Level” or “Depth” depending on your synth.
This is how you set “how much” modulation should occur. For example, you want to modulate the panning of sound. But you don’t want it to pan from 100% left to 100% right. You want it somewhere in the middle.
This is where the modulation amount comes in.
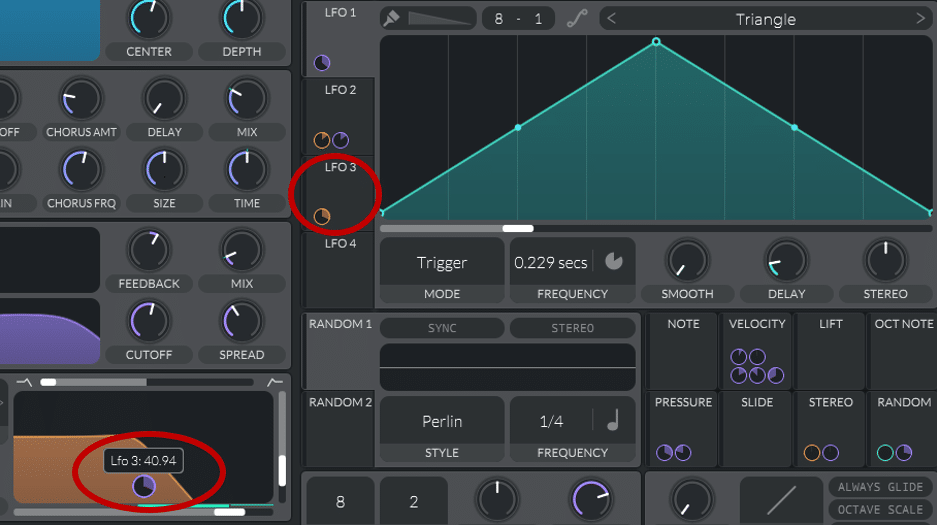
In Vital, the amount of modulation is shown through little “wheels”.
Another way to quickly set the amount of modulation is through the Matrix. Both Vital and Serum have one:
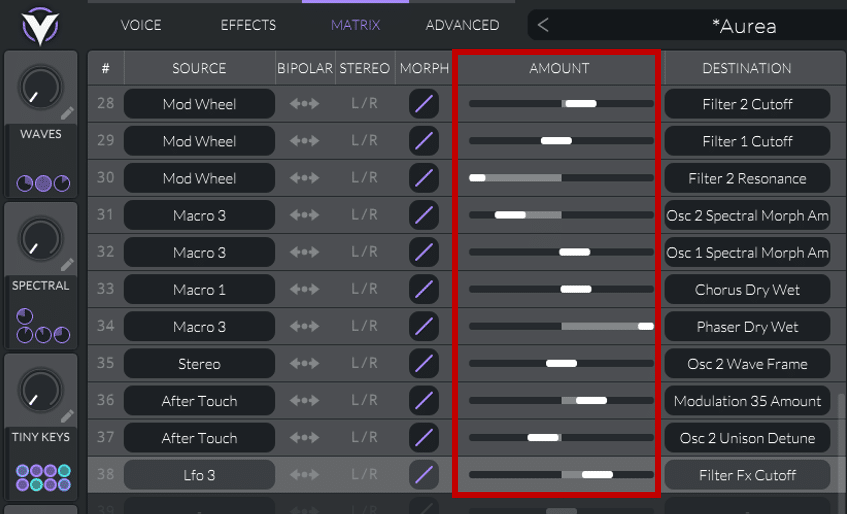
Here, you can easily tweak the amount of each modulation.
Mode
Finally, most LFO tools will have different modes. This basically tells the LFO where it should start.
The 2 most common modes are:
- Trigger mode: every time a new note is played, the LFO starts from the beginning
- Envelope mode: the LFO acts as an envelope – when it reaches the end of the shape, the modulation stops.
Next up, let’s look at how to actually set up an LFO! 👇
How to Route an LFO (2 Methods) 🧐
There are 2 basic methods for routing. One is internal, and the other (you guessed it) is external.
Let’s explore both.
Internal Routing
Firstly, let’s look at internal routing. This method uses the internal features of your synth.
Let’s have a look first at Serum:
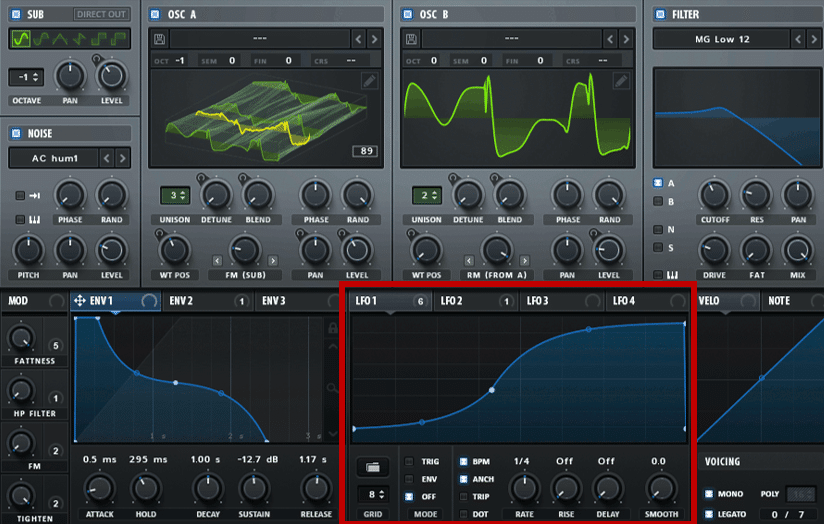
Serum provides you with 4 customizable LFOs. You can either pick preset waveforms or draw-in your own.
To modulate a parameter, simply drag and drop the LFO:
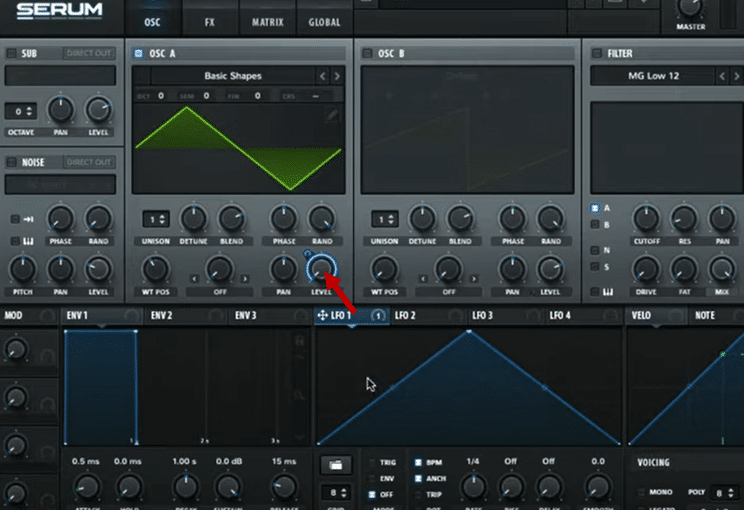
You’ll know that your modulation has been routed thanks to the highlighted blue contour.
To dial in the amount of modulation, drag the little blue circle up or down:
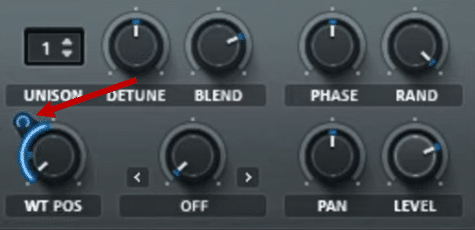
Now you might be thinking that just 4 LFOs isn’t a lot. But don’t forget that you can assign the same LFO to any number of parameters!
Now let’s have a look at Vital:
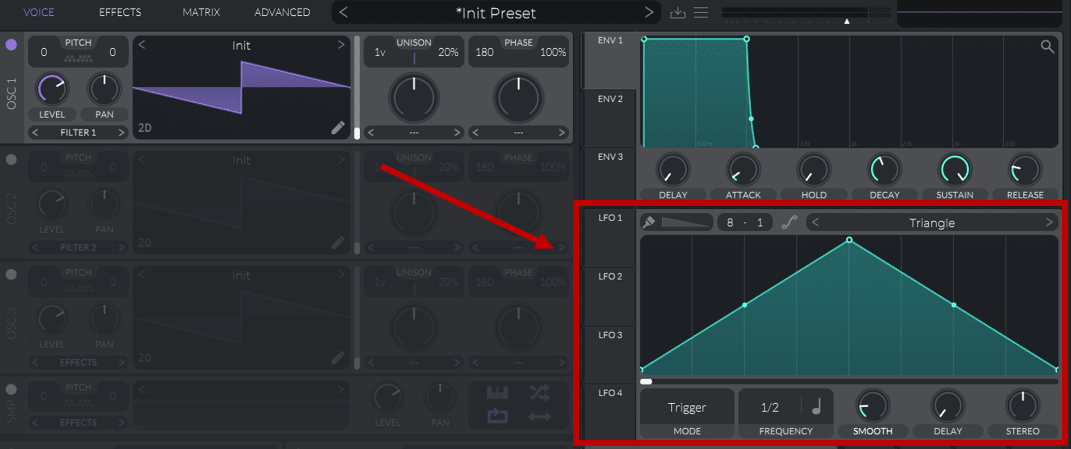
Vital provides 4 different LFOs to play with. However, as you start using them up, new ones will appear!
In total, you actually have up to 8 different shapes you can use:
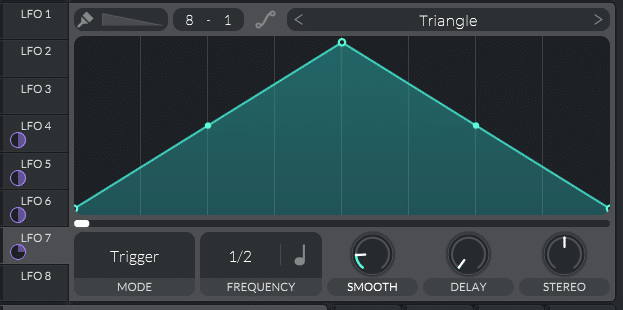
Not bad for a free synth, right?
Assigning LFOs works in much the same way as Serum. Simply drag and drop the LFO to any parameter you want.
You can then control the amount of modulation in 2 different places:

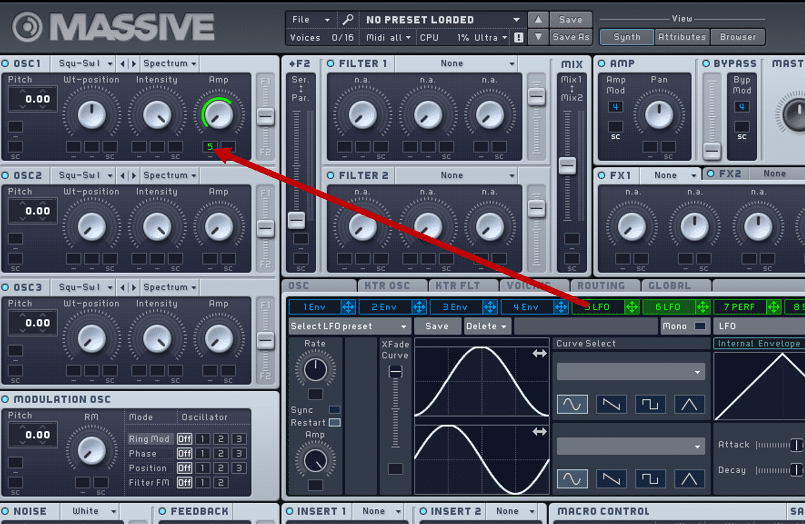
Each synth will have slight variations. So it’s worth spending some time to understand how yours works. For example, Massive has a little section where you drop the LFO:
Want Serum presets that work out of the box?
Download our FREE EDM Essentials for Serum preset pack with 60+ high-quality sounds – from soaring leads to smooth pads. Suitable for any genre, style, or sound.
External Routing
External on the other hand means you’re using a device outside of your synth.
There are many reasons you might want to do this. For example, you might want to modulate a parameter of an FX plugin. Let’s have a look at some examples in FL Studio and Ableton Live.
In FL Studio, one way to assign LFO is to use the Peak Controller:
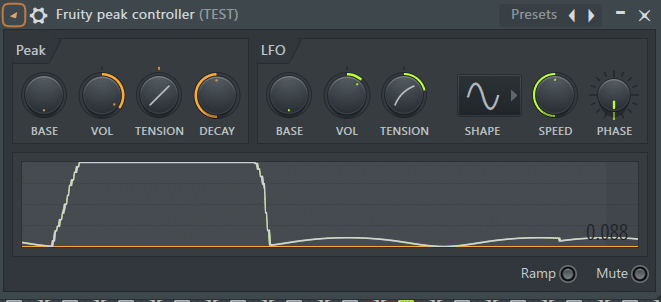
The Peak Controller won’t be affecting any sound directly. So you can load it up on any channel you like.
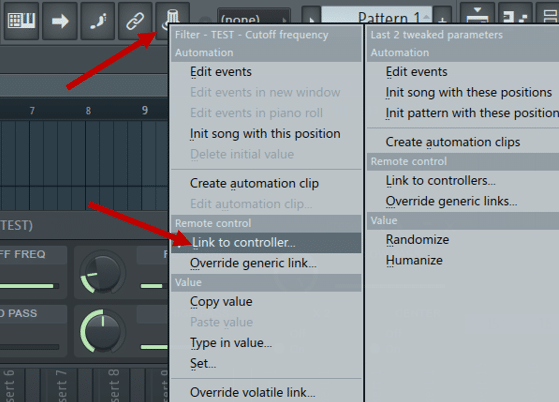
Next, select the parameter you want to modulate. In this example, I want to modulate the cutoff frequency of my Fruity Filter:

Slightly move the cutoff knob. Then, right-click on “Multilink to controllers” and select “Link to controller…”:
Finally, under “Internal controller”, select “Peak ctrl – LFO”, and hit Accept. And voila!
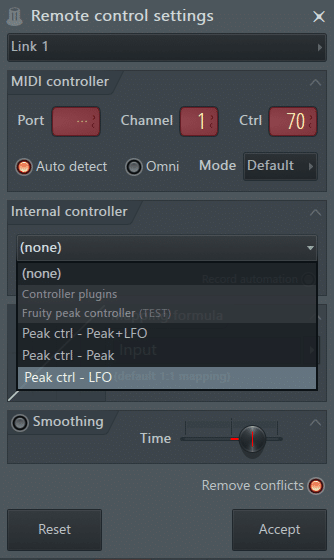
The frequency cutoff of the Fruity Filter is now modulated by the Peak Controller LFO.
You can choose from 4 different shapes: sine, square, triangle, and random. “Base” sets the starting point of the LFO, while “Vol” controls the amount.
Now let’s look at how to achieve this in Ableton Live.
For this, you will need to have Max4Live installed. Simply download LFO 2.0 here.
This is what it looks like:
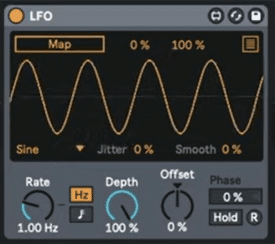
Simply click on “Map”, then click on the parameter you want to modulate. Boom – you’re now modulating the parameter with the LFO!
The range here lets you control the boundaries of the parameter:
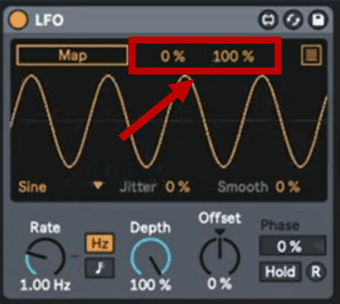
You can also use the Phase knob to better sync the modulation with the tempo.
And What About Dedicated Plugins?
I don’t personally use 3rd-party plugins for LFOs. Nothing against them, but I prefer to do as much as I can “in the synth”.
However, there are a few options out there if you’re interested.
Firstly, let’s talk about LFO Tool by Xfer.
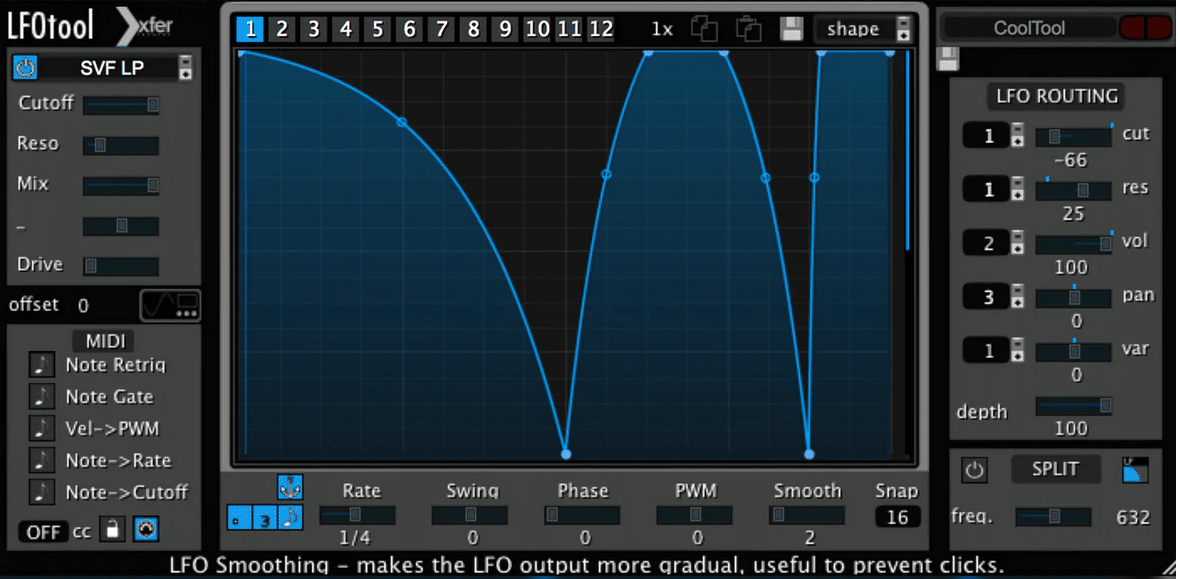
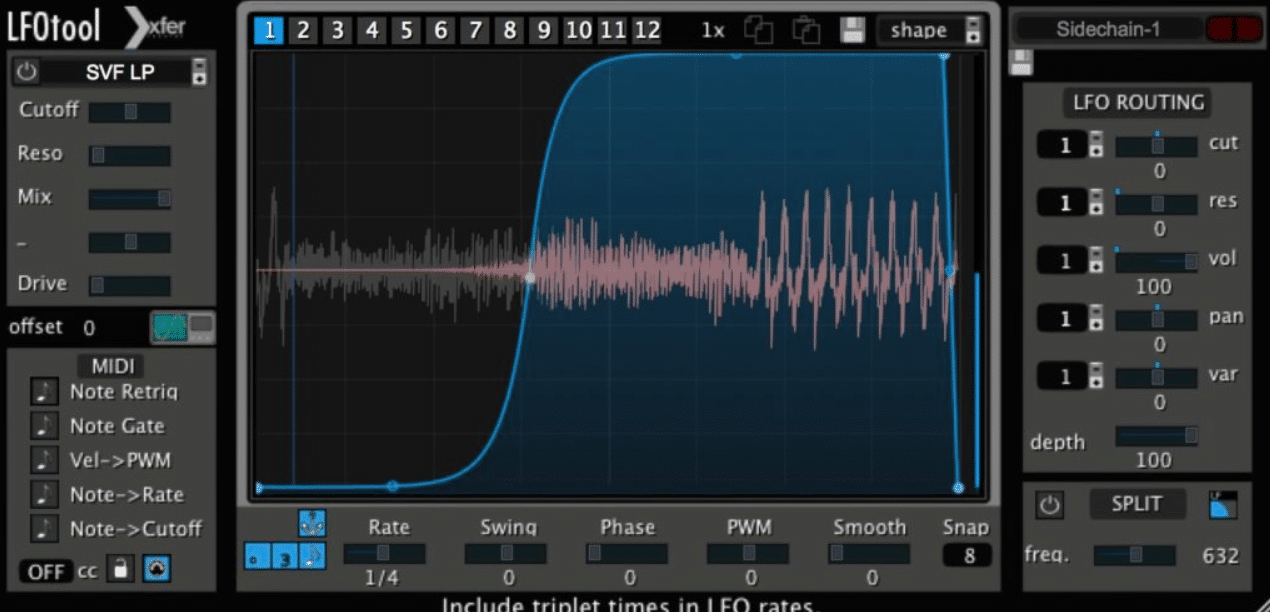
LFO Tool is the most popular LFO plugin on the market. You’ve probably seen it on some production walkthroughs, where people often use it for sidechaining.
LFO Tool features 12 fully-customizable curves.
You also get 93 different presets and a great visualization tool. This helps you understand how LFO Tool is shaping your sound:
Midishaper by Cableguys is another popular option.
It is slightly cheaper than LFO Tool (USD 29 vs. USD 50). However, its interface can be somewhat more daunting:
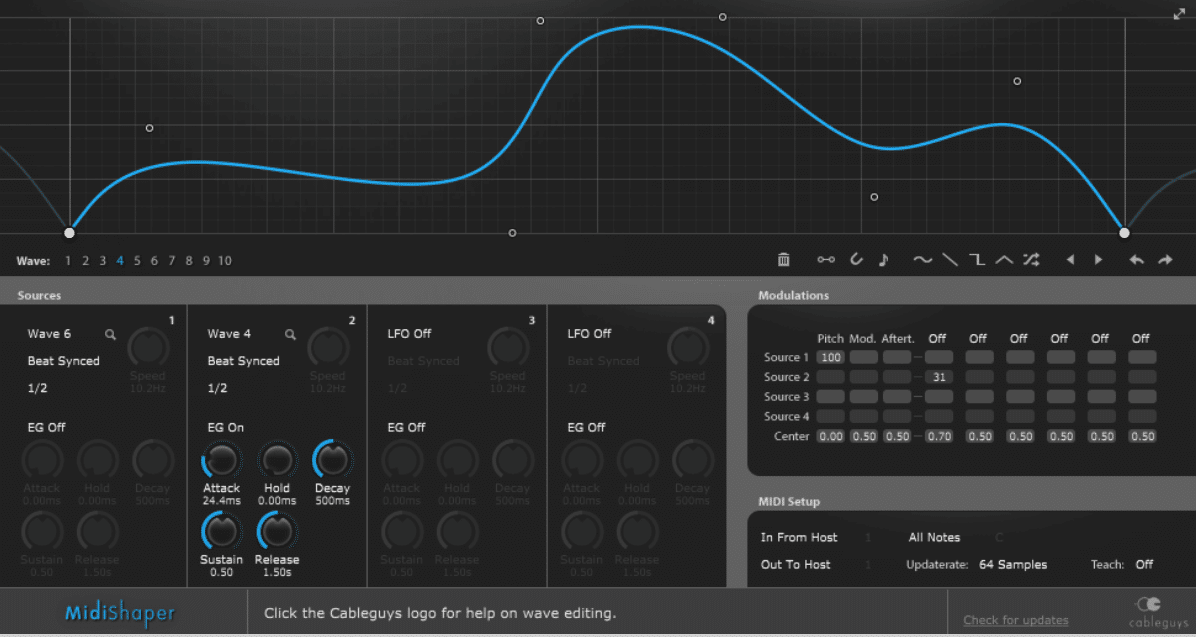
Here, you get 10 fully customizable waveforms. You also have a handy Modulations matrix. This lets you see at a glance the different modulations in operation.
By default, you can modulate the Pitch, Mod Wheel and Aftertouch. But you also get 5 customizable columns where you can assign any parameter within your DAW.
Finally, if you’re looking for a small, free option, check out STFU by Zeek:
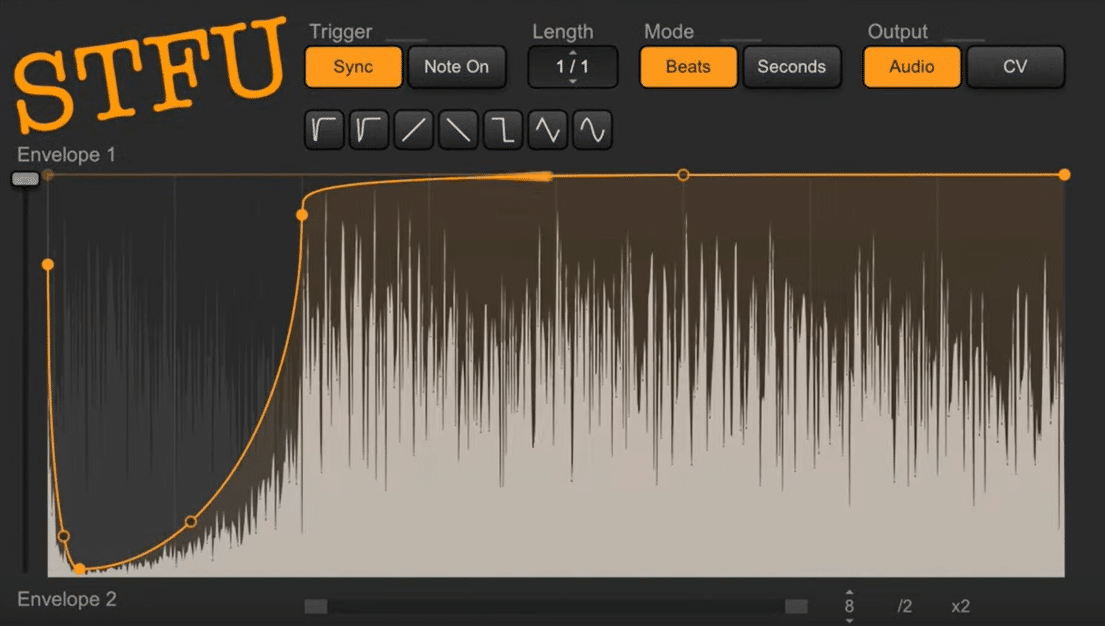
You can quickly see that it was inspired by LFO Tool. Inside this plugin, you get 2 envelopes and 6 basic waveforms that can be customized.
The shape can be triggered either by MIDI or by audio. It also offers a great visualizer to shape your sounds with precision.
5 Use Cases for LFOs
Finally, let’s look at when to use an LFO. Keep in mind these are just examples; one of the great things is their versatility. The best results come from simply experimenting and linking parameters at random!
The Wavetable Mover 🚚
Modulating the wavetable position is a great way to add some subtle variation to a sound.
I find this works especially well with pads. For this, I prefer to choose a slow rate. That way, I get a slow-moving modulation:
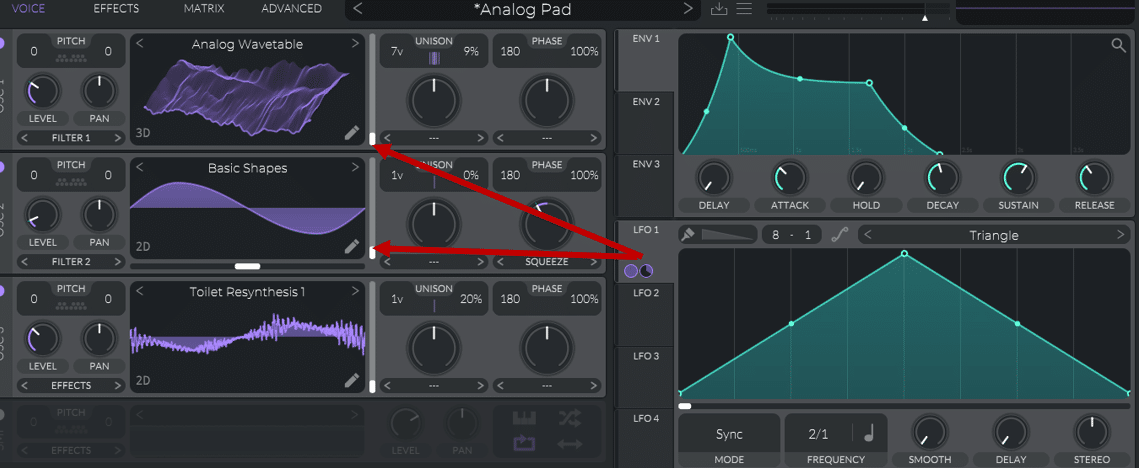
This is what it sounds like:
Nice!
If you’re interested, we have a full guide on how to create the most lush pads 😉
The Frequency Cutter ✂️
Automating the frequency cutoff is a common way to use an LFO.
This works especially well on bass such as the Neuro bass sound. Here is what it sounds like:
To get that “open-and-close” effect, I am assigning an LFO to the cutoff of Filter 1:
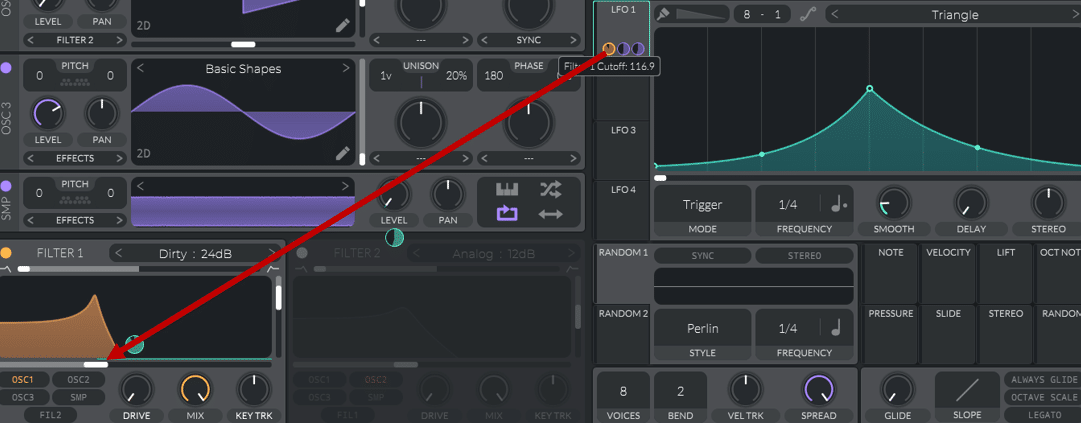
For the shape, I started with a Triangle, and then accentuated the slopes. Finally, I set the rate to a 1/4 note dotted, which gives it that off-beat groove.
If you want to learn how to design this bass sound and many others, check out our full guide here!
The Space Widener 🎧
Use an LFO to create more width in your sounds. For example, try using it on the panning of a background arp:
You can also use this trick in transitional effects. For example, you can make a riser appear on the left side. As it rises, it slowly moves to the right side:
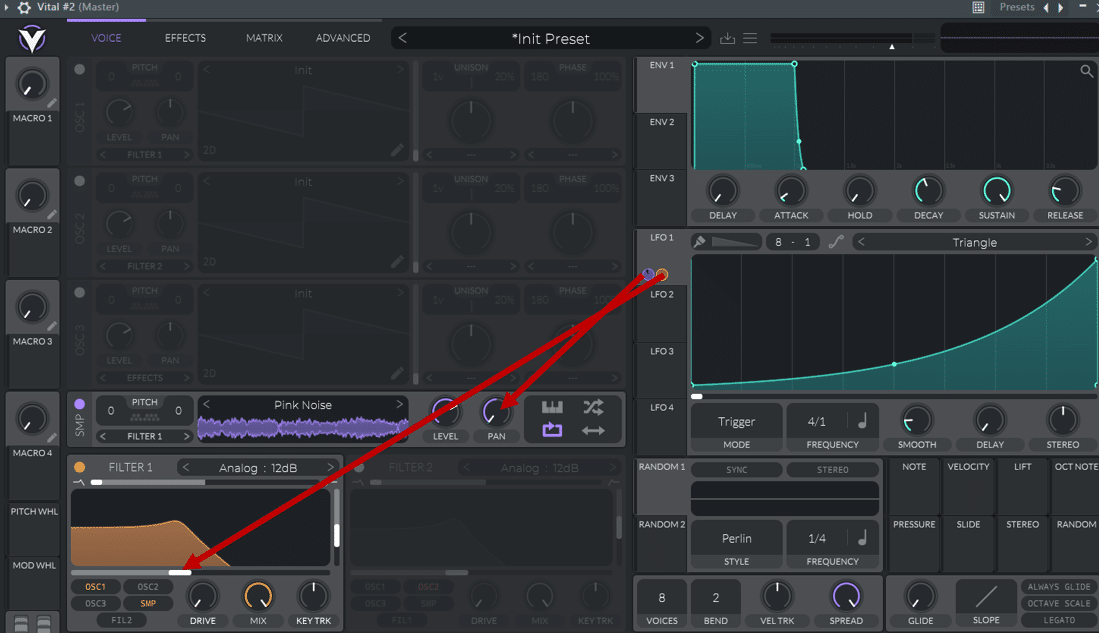
Here, I am also linking the LFO to the filter cutoff. Here’s what it sounds like:
You could technically achieve the same result by drawing automations. But I find this method of working within the synth… cleaner 😊
Looking to create unique transitions in your tracks? Check out our latest guide here 🔥
The LFO Inceptor 🎎
Remember that movie Inception? A dream within a dream? What if I told you you could do the same with LFOs…?

OK, it’s not quite as impressive as the movie.
But still, you can get awesome results by using one LFO to modulate a second! Typically, you would use an LFO to modulate the rate of a second LFO. Let’s have a look:
You can hear how a first LFO is modulating the cutoff frequency of a filter. But as the track progresses, that modulation is happening quicker and quicker.
To do this, simply assign one LFO to the frequency of another.
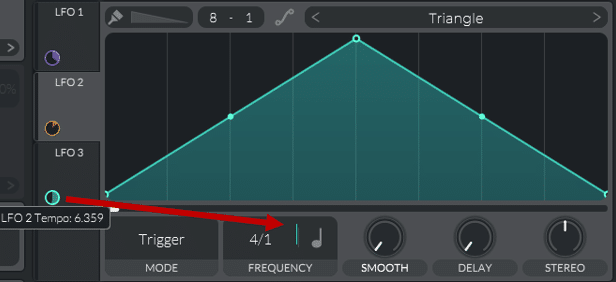
Here, my LFO 2 is modulating the cutoff frequency. Then, I assigned my LFO 3 to the rate (or “frequency” – I know it’s a bit confusing) of LFO 2. This means the speed of LFO 2 will rise, making the filter move even faster!
The Arp Acceleretor 🚄
Finally, let’s look at a last handy trick to build tension. This one is super popular in Deep House and Progressive House genres.
The idea behind it is to modulate the speed of an arp.
This is what it sounds like:
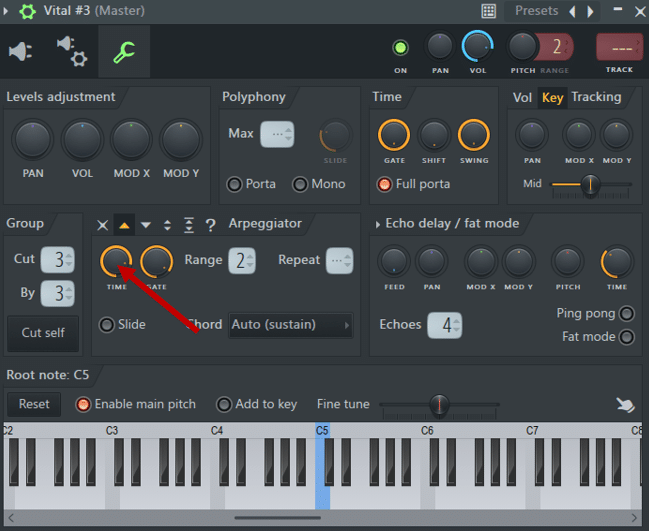
For this, I am using Fruity Peak Controller to modulate the Arpeggiator Time knob:
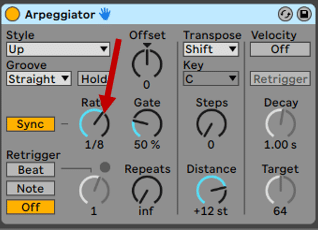
In Ableton Live, just load up an Arpeggiator from the MIDI Effects and modulate the Rate with LFO 2.0:
Wanna learn 3 underrated arp tricks? We have you covered in this extensive guide 🔥
Want Serum presets that work out of the box?
Download our FREE EDM Essentials for Serum preset pack with 60+ high-quality sounds – from soaring leads to smooth pads. Suitable for any genre, style, or sound.
That’s a Wrap! 🙏
That’s it for this guide! Hopefully, you now have a better understanding of what LFOs are, and how to use them 😊
Did I miss out on anything? Let me know over at [email protected]

