


In this post, I’m going to share 50 practical tips on how you can improve your mixes.
These are mixing techniques and strategies used by myself, and many other professional producers to:
- Improve their mixing workflow
- Achieve clean, powerful mixes
- Improve their monitoring environment
And more.
Let’s dive right in.
1. Do a Final Mix at the End
Some mixing during the production and songwriting stage is necessary (like volume adjustments), but it’s worth saving bulk of the mixing work until the end.
That way, you can put your creative brain aside and focus on making technical, practical decisions that help polish the track.
Creative action, idea generation, and songwriting first.
Mixing, editing, adjusting, and mastering second.
This approach to workflow will not only help you produce faster, but you’ll likely end up with better-sounding mixes.
2. Start with Good Sounds (and Keep Things Minimal)
Recently, my mixes have begun to sound cleaner even though I’m spending a fraction of the time actually mixing.
Why is this?
The more careful you are with sound design, sample selection, composition and arrangement—the less work you need to do at the mixing stage.
Also, keep things minimal. It’s easier to mix a chorus that has 10 elements than one with 40-50 individual tracks.
With fewer elements, you can focus on making each one sound great.
It’s your job during the production stage to choose the best elements for the song.
This includes your sound design and sample selection. Make decisions with the final track in mind.
If you need good free samples, check out our curated list here.
Note: it starts at an even more fundamental level than this – composition. If your songwriting isn’t good, using great samples isn’t going to make your track enjoyable. Read this article for a better understanding.
3. Don’t Start Mixing Prematurely
Before mixing, listen through your track a few times and make sure you’re happy with the arrangement, the sounds you’ve used, and the general flow of the track.
The mix doesn’t have to be perfect, as you haven’t got to that stage. But your song should more or less be finished composition and sound design wise.
It’s okay if your lead synth is too loud, but if the lead melody is off or the synth patch is bad, you’ll want to go back into the track and fix these before you begin mixing.
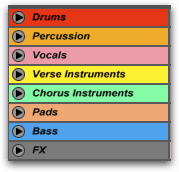
4. Label and Color Tracks
Labelling and coloring tracks speeds up workflow – big time.
Why? Our brain responds to color faster than it does to words, and it keeps things organized.
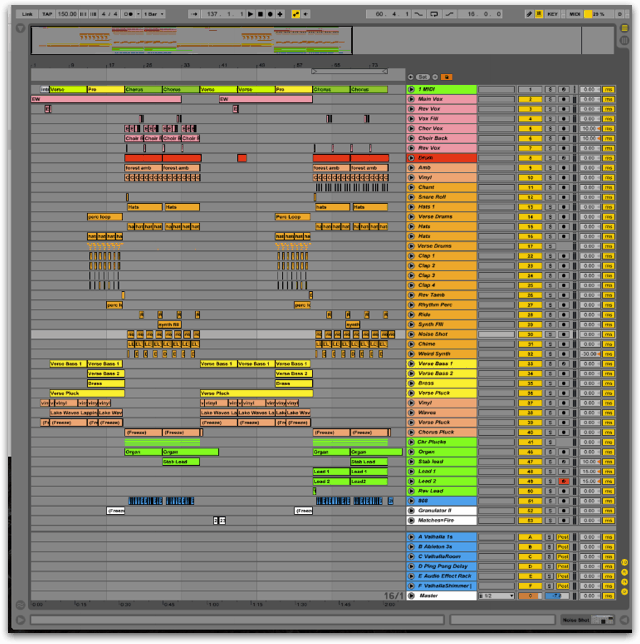
Here’s the color scheme I use for my projects. Feel free to copy it.
But remember: it doesn’t matter what system you use, as long as you have one.
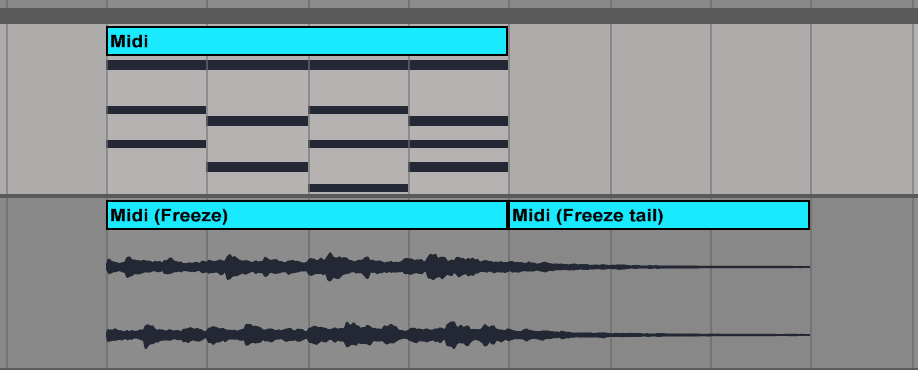
5. Bounce MIDI to Audio
There are numerous benefits to bouncing MIDI to audio:
- You can visually see where the audio starts and ends, making it easy to clean things up (reverb tails, delay tails, etc)
- It’s CPU-friendly
- It forces you to commit. Once you’ve converted a track to audio, you’re forced to work with what you have. This way, you’re not wasting time making endless tweaks to a synth patch. You can focus on finishing the track.
Read: 5 Reasons You Should Work With Audio
6. Group Similar Tracks
Grouping similar tracks can help you achieve a more ‘unified’ sound through bus compression, EQ, reverb, and more.
It’s also a lot easier to visualize your mix in groups. In fact most DAWs allow you to stack groups for even further processing and organizing.
7. Avoid Mixing When Your Ears Are Tired
If you’re listening to music all day, or working in a place with loud noises – then mixing down after that means you’re doing your music a disservice.
That being said, if you haven’t been blasting your ears all day, maybe working at night is better for you.
Adding to this, make sure to separate the writing and mixing sessions of a song. Don’t write a track for 6 hours then immediately begin mixing: make sure to start each mixing session off fresh.
8. Try Out a Fader-Only Mix
A great way to mix a track is to use the fader-down mix technique.
First, bring all faders down.

Then, bring up the most important element, and level it in the mix.
Next, bring up the second most important element, and level it in the mix.
Next, bring in the third most important element, and level it against the first two.
You get the idea.
For example, you may bring the kick in first, then bring in the bass, then the vocal, and so forth.
9. Highpass (Almost) Everything
I want to be careful with this advice because it is possible to overdo it, but highpassing is a powerful technique.
Here, you want to filter out all the unneeded low-end information from each track. It’s important to use a good monitoring environment and/or headphones to hear the impact on your bass.
Highpass up until the point where it affects the sound, and adjust it depending on the sound.
For example, you don’t want to set the highpass of a snare too high, as you might get rid of the fundamental frequency too much.

But a white noise sweep? You could probably highpass that at least around 500Hz.
Why is highpassing important? Many instruments, especially acoustic recordings, will have low-frequency information that adds no value to the track. Even electronic elements may have low-end vibrations as a result of processing like distortion.
It’s taking up space, making less room for everything else in the track (especially the kick and bass). This is why you want to remove it using a highpass filter.
Note: Kick and sub-bass are an exception here. Along with anything else you think needs frequencies under 100-150Hz.
10. Use Reference Tracks
Reference tracks are an essential part of the mixdown process.
While mixing, it’s important to constantly reference the mix of similar tracks. That way, you can make sure the dynamics and frequency balance of your track are up to industry standards.
It’s also helpful if you have a less-than-ideal monitoring environment. If a reference track sounds similar on your setup to yours, it’s likely it’ll perform similarly on other systems (make sure to check, of course).
Oh, and don’t route your reference track through your mix/master buss, otherwise you’ll affect its sound.
If you’re an Ableton Live, check out this great resource from pAtches on reference tracks.
In any given song you’ll have one element that’s the most important. In a pop song, it might be the vocal, in dubstep, it might be the bass, and in trance, it might be the kick.
11. Start With Your Most Important Element
Once you’ve determined what the most important instrument is on your track (e.g. the kick, vocal, synth, bass), use it as a reference point and build all other elements around it.
When mixing, ask yourself “How can I help make the most important element shine?”
I typically start with the kick. Any time I add an element that causes the kick to lose punch I know I need to adjust the new element.
12. Devote Time to Your Mixdown
It takes time! Mixing down a track involves effort, hard work, and time.
If you know that you’re heading out in 30 minutes, then it’s probably not the best time to start a mixdown. Find a time where you can commit a couple of hours solely to mixing.
As I’ve reiterated multiple times on the blog, separating parts of your music production is paramount to good workflow.
13. Mix at an Appropriate Volume
Mixing at a lower level not only reduces the risk of ear fatigue (and permanent hearing damage), but it’s a great way to judge your mix more accurately because:
- You have less harsh room reflection
- You get a more accurate balance, if you can’t hear something at a low level then it may be too quiet
- If it sounds good at a low volume, it’s generally going to sound good at a high volume
It’s important you don’t mix too quietly either, otherwise you won’t hear an accurate representation of your track.
A good volume is normally one that allows you to have a conversation without raising your voice.
14. Mastering Won’t Fix Anything
Whether you master yourself or get an engineer to help – don’t tell yourself that mastering will fix the problems you have in your mix.
If there are problems in your mix, it is your job to fix them.
If the low-end is too loud, then fix it. If you’ve got a harsh high-end, fix it! Don’t procrastinate and convince yourself that mastering will solve all your mix problems.
15. Learn to Use Your Tools
I see a lot of new producers posing questions like, “How good is compressor X?” Or, “Sick of Fruity Reverb, what do you recommend?”
A new plugin will not make your mixdown sound significantly better if you don’t know how to use these tools first. If you’re unaware of how a compressor works, then why would you buy (or acquire) a different one?
16. Consider Using volume Automation Instead of Compression
Compression is a great tool and it’s important to understand when to use it. However, there are often times where volume automation is more applicable.
If you’ve got some loud peaks in your song, compression can fix them – but so can placing a little dip with an automation clip. It’s a lot more flexible and may just prove beneficial to you.
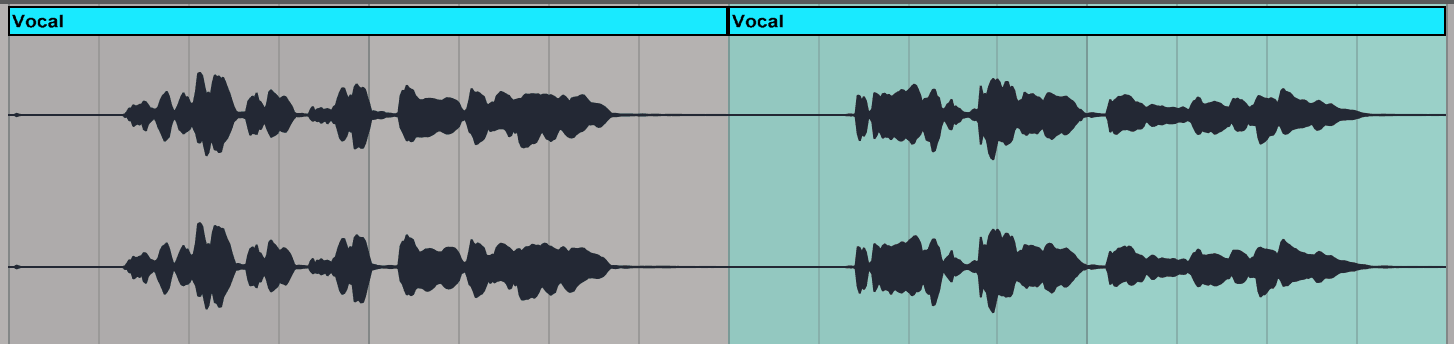
For example, take the following vocal track:
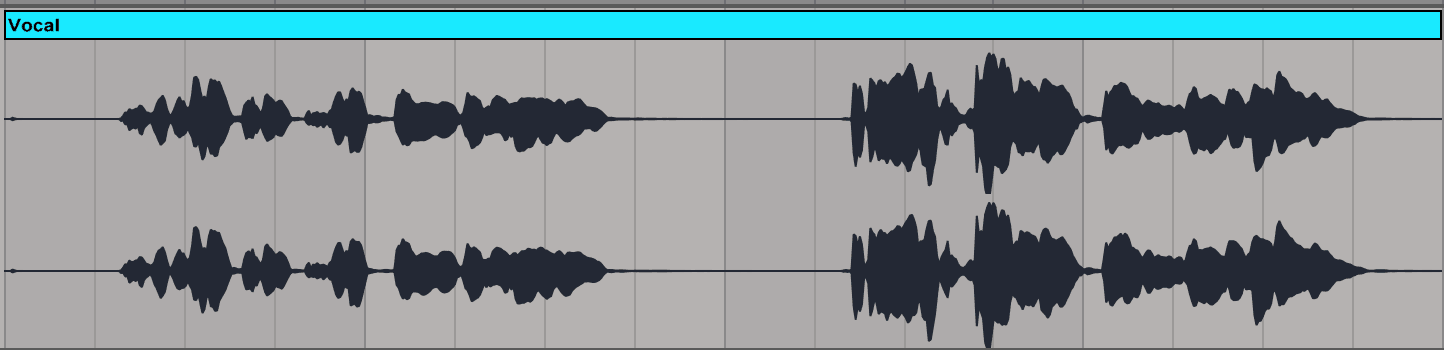
The second phrase is louder than the first, so I’d like to lower its volume. I could use compression, but it would compress the second phrase while not compressing the first. This will make the dynamics between the two phrases different, which will likely sound bad. Instead, what I should do is automate the volume of the second phrase to be lower.
Below, I’ve lowered the volume of the second phrase by 3 dBs. Now, the average level of the first phrase matches that of the second.
A great third-party solution for vocals would be the Waves Vocal Rider.
There are many instances where you can use volume automation in your mixdown. For example, you might want a loop to be louder in the verse then in the chorus. Rather than using compression to “control” the level, use volume automation to preserve dynamics through volume automation.
17. Use Subtle Sidechain Compression
Many people use sidechaining for the classic “pumping” effect, but neglect to use it in a traditional sense. The original purpose of sidechain compression was to duck one signal to make room for another.
The most common application, which you likely already use, is to duck the bass to make room for the kick. Aside from the pumping effect, it’s a practical mixing strategy.
You can use subtle sidechain compression throughout your project to create space and movement. If two elements are clashing and you can’t fix it with eq, consider using subtle sidechain compression instead.
Examples include:
- Sidechaining the bass to the snare.
- Sidechaining the reverb/delay to the lead synth.
- Sidechaining the percussion loops to the lead synth.
- Sidechaining the clap to the kick.
There’re plenty more examples, as you could imagine. Get creative with this concept, and don’t be afraid to try unconventional sidechain routing.
It may sound too small of a change to notice on one sound, but on many, it can really tighten up a mix.
18. Use Your Ears, Then Your Eyes
Spectrum analyzers are an invaluable tool to analyze the frequency balance of a mix. However, what matters most it how it sounds.
If the bass appears too quiet on a spectrum analyzer but it’s too loud in your ears, don’t turn it up to make it ‘look right’.
During the mixdown phase, use visual tools to confirm only what you’re already hearing with your ears.
Don’t have a spectrum analyzer? Check out SPAN.
19. Your Tools Aren’t the Problem
Whether it’s VST’s, your DAW, or your monitoring environment – don’t make excuses.
When Porter Robinson wrote his Spitfire EP, his studio setup was humble, to say the least.

“My studio was lo-fi by necessity; I was fourteen with no reliable income. I was monitoring my music using $100 Logitech speakers, and I only used software.” – Porter Robinson via Musicradar.com
Good tools help a lot, but they aren’t required. In fact, less-than-ideal tools can make you a better producer because you get the most out of everything.
The most important thing is that you know your gear inside and out.
20. Keep Your Ears Clear
Don’t wear anything that covers your ears, for that matter.
For example, a beanie might cover your ears, so either take it off or move it out of the way.
Wearing something over your ears blocks out a lot of high-frequencies and can impact the mixing and mastering stages.
21. Be Creative
In my perspective, there are two main types of mixing – technical and creative.
The technical side is making the song sound cohesive: making everything fits together and making sure it translates across multiple speakers. Unfortunately, many people stop here.
There’s also the creative side of mixing. This is where you make elements sound unique and interesting.
Don’t just throw an EQ on your lead and call it. Play around with different types of post-processing to add texture and creative.
Have an element stick out more than in other songs in the same genre.
More than anything, be creative.
22. Don’t Overuse Compression
In electronic music, many sounds have very controlled dynamics, and often already have some sort of compression applied.
Don’t use compression ‘just because’. Use it if you need to or want to change the character of a sound.
Many people prescribe compression to treat mix problems when in reality it makes the problem worse. As I said, most in the box sounds, such as soft synths and drum samples, won’t need much compression because it was made in a controlled, digital environment, or already has it.
Contrast this to a recording of a vocal or guitar – they will need compression because of the natural variations in volume.
To summarize: compress with a purpose.
Read: Stop Using So Much Compression
23. EQ Doesn’t Solve Everything
Unnecessary EQ is one of the most common mistakes producers make.
Most of the time, they’re trying to solve a problem that could be fixed simply by turning a fader up or down.
It makes sense – EQ allows you to control the frequencies of a sound at an individual level.
Faders allow you to control the frequencies at an overall level.
24. Don’t Blindly Copy Other Artists
If Noisia boosts their snares at 150Hz, it doesn’t mean you should start doing it in every mix.
If you’re wanting to learn new techniques, you first have to work out why the producer did it. Was it to add more punch? Was it to clean up the mix?
Whatever it is, work out why they did it, and then adapt it to your own productions.
25. If You Don’t Know What it Does, Don’t Use it
“Ohhh, what’s a flanger? Maybe I’ll stick this on my drums bus!”
Really though, if you’re not sure of what something does – why not research it? Or listen to the actual effect it has. Why are you using a transient shaper on your snare if you don’t know what it does? You get the idea.
Study and then use.
Note: to play devil’s advocate – creativity benefits from experimentation. I think adding a bunch of random stuff to an FX chain can result in happy accidents, but if you truly don’t know what you’re doing and it doesn’t sound better – then it’s probably not worth using.
Remember the maxim: if it sounds good, it is good.
26. Recalibrate Your Ears
I’ll talk more about breaks in the workflow section, but after mixing for long hours at a time it’s important to take a long break (30-60 minutes or more) to completely recalibrate your ears so you can start fresh afterwards.
It helps to actually go somewhere without too much noise. While listening to music isn’t necessarily bad, it can be a distraction.
Go outside, take a walk on the beach, or at least get out of your chair!
27. The Best Mixing Tool: Faders
In an elite session at Pyramind, Steve Duda talked about how he could beat anyone in the room at a mixdown using only volume faders.
Why is this? Because volume is the most important mixing tool.
Before you apply any EQ, compression, or limiting, it’s essential to have your levels set first.
You may think a sound needs compression when in reality it’s just too loud. If you can get the relative levels of your mix right, the rest of the mixdown will be much easier.
28. If It Sounds Good, Leave it!
This goes for everything from mixing to sound design to creating melodies. Don’t overproduce. Know when to stop.
If you EQ something, and it sounds good – just leave it! Don’t make it sound worse by adding a plethora of effects on top.
29. The Fader Trick to Set Your Levels Right
If you’re struggling to set the volume of a single channel, try out this technique:
- Step 1: Bring the volume fader all the way down. Then, slowly increase the volume until it sounds just loud enough. Note down this value.
- Step 2: Bring the volume fader all the way up (being careful not to hurt your ears). Then, slowly decrease the volume until it sounds just quiet enough. Note down this value.
- Step 3: You should end up with two different values. It’s safe to say the “correct” volume level is in between these two levels.
For example, let’s say in Step 1 the fader level is at -17.0 dB, and in Step 2 the fader level is at -14.0 dB. It’s safe to say the chanel should be somewhere between -17.0 dB and -14.0 dB.
Use your own judgement on top of this, of course. The main element may need to be on the louder end of the range, whereas a background element may be better on the quieter end.
30. Use Subtle White Noise
There’s a reason why it’s used in 90% of EDM tracks. It’s a waveform that has no tone, and it’s great for filling out your mix.
Use it sparingly, of course, there’s nothing worse than an abundance of white noise that drowns out everything else. You can use it rhythmically, sidechain it, whatever! Experiment.
The key is to make it loud enough to make an effect, but not so loud that it takes over the track.
Note: Be careful about the low end of white noise. White noise generated from a synth will have sonic information across the whole frequency spectrum, so you’ll want to remove the low end.
Sometimes, it helps to highpass white noise up to 5khz/10khz in order to leave space for your main instruments.
31. Mix your Drums and Bass First
A lot of electronic dance music relies on the drums and bass as foundation elements. After all, that’s what makes people dance.
Starting with these elements in your mix can provide a much easier template to work off compared to going backwards from something like the synths and FX.
It’s also arguably the hardest part to get right in the mix, so if you sort it out first then it’s less of a mission to do the rest.
32. Channel strip workflow: corrective then creative processing
When mixing an individual channel, my workflow looks like this: fix problems first, then add creative effects.
Why is this? Because if there’s a problem with an instrument, effects like reverb, compression, and distortion are only going to make it worse.
For example, if there’s a harsh resonance at 5 kHz, adding distortion will further emphasize this problem.
Instead, the first step should always be corrective. Clean up the sound using EQ and compression before you add creative effects.
33. Always Sleep on It
You’ve got your mixdown finished, it’s 2am in the morning. “Great!” You tell yourself, “Time to send it off to some labels.”
Hold up, buddy.
You’ve just been mixing for the last 6 hours, there’s no way that what you’re hearing is accurate.
If you finish a mixdown, wait until the morning and listen to it with a pair of fresh ears. I know this is hard, as we all want to share our art with the world – but it’s better to be safe than sorry.
34. Clean up Delay and Reverb Tails
Reverb and delay tails are easy to overlook, and unfortunately, they can add a lot of unnecessary muddiness to a mix. I’d recommend bouncing tracks down to audio so you can see where the audio tails end.
This way, you can cut them, fade them or even get rid of them altogether.
If you don’t bounce them, at least look at your reverb settings – most of them have a volume and EQ section that will allow you to tailor the tail to your liking.
Recommended: 7 Awesome Reverb Plugins for Mixing
35. Constantly Turn Plugins Off/On
Sometimes we can be adding an effect and think we’re making the sound better when in reality we’re not.
It’s alright if you’re not a master at compression or distortion: this means you have to trust your ears to determine if a plugin is helping or hurting
Most DAWs allow you to bypass an effect with a single mouse click. Do this while using a mixing plugin to hear the difference.
If your DAW allows key-mapping, you can map a key on your keyboard to the on/off button for the plugin, making it easy for you to analyze the effect.
Tip: I’ll map a plugin’s on/off button to my keyboard, look away from the computer, then mash that key, randomizing the plugin’s on/off button. That way, I can make an objective decision about whether or not the plugin is helping.
36. Be Open to Compromise
There will always be things in your mix that just don’t work out. You gotta let them come to an agreement, and sometimes that means removing an instrument or sound regardless of how emotionally painful it is to do so.
Embracing the fact that some things aren’t going to work, and knowing how to deal with them will increase your workflow tenfold.
If you know that two elements just aren’t going to work together no matter what, then deleting one can save you hours of hassle and stress.
37. Mix in the Right Order
Some high profile mix engineers know exactly what they’re doing and when, so it can seem like organized chaos.
But if you’re not someone who’s been doing it for 10+ years, then it makes more sense to work in a logical order.
For example: Finding balance with faders and EQ, then adding compression, spatial effects, and automation.
Organizing your mixdown in sections like this is a great way to speed up workflow and stay motivated.
If you know there’s something you need to do, but now’s not the time, write it down. That way you can come back to it when there’s time.
38. No Energy? Leave it for Tomorrow
Unless you’re making a living off mixing (and you probably wouldn’t be reading this if you were), then you shouldn’t think of mixing as something you ‘have to do’ right now.

If you’re not feeling it at the time, then wait until you do. If you go into a mixdown with a negative mindset, then you’re just going to half-ass it.
39. Work in Bursts
I like to work in 45-minute bursts when I’m mixing, and then take a 10-15 minute break.
Two reasons for this:
- You reduce the likelihood of ear fatigue
- You stay inspired and motivated
If you work constantly without taking breaks, you’ll probably get burnt out and experience some degree of ear fatigue. Figure out what works best for you!
40. Learn Your Keyboard Shortcuts
I know it’s horrendously boring to do so, but knowing your shortcuts will save you A LOT of time.
The most important ones are those that help you move around your project quickly. Further, some DAWs allow you to set up custom key macros. Read the manual to find out your DAW’s keyboard shortcuts.
Overall, keyboard shortcuts allow you to move around a lot quicker.
41. Don’t Stress Yourself Out
It’s easy to feel overwhelmed during your mixdown because of the sheer amount of work.
The key is to focus on one thing at a time. Identify a problem, fix it, then move on to the next one.
Focusing on 5 things at once is an easy way to get burnt out.
Simplify your goals to make your workflow run smoother.
42. Embrace Commitment
This might seem contrary to tip 38, but there’s a balance.
I’ve already said this, but do something, finish it and then leave it. Commit. While a mix doesn’t have to be done in a day, a mixdown should not take two months!
43. Always “Save as New“
Before you begin mixing, save a new version of your project. This way, you can always go back to the old project if you make permanent changes/mistakes.

You can also do this during the mixdown stage, saving new projects along the way.
This will make it easier for you to commit to your decisions, giving you a backup you’ll likely never use.
44. Make Yourself Comfortable
Like I said earlier in the article – you should devote time to this. Not heaps, but enough. Because of this, it helps to be comfortable.
If you don’t have a comfortable chair, then get one. If you have to constantly stare upwards at a screen that’s way above your head, then fix it. Making small adjustments like this will pay off in the end.
45. Don’t Rush It
Despite all this workflow and productivity advice, I must recommend not to rush the mixdown – which can be easy. I can’t give any tips for this, because it’s up to YOU to find the perfect balance.
Treat your music like it’s your own baby.
46. Seek Out Constructive, Negative Feedback
Read that again.
And again.
Seeking out negative feedback is painful, but it’s tremendously helpful if you want to improve at your craft. If you’re showing some friends a song, ask them this question:
What DON’T you like about it?
This might sting a bit, but it’s far better than someone saying, “Yeah it sounds nice bro.” Because that’s not going to help you improve.
Obviously, there are just mean spirited people who will say things like “sounds trash,” but that’s not helpful either.
Find honest people who care about you getting better. Here’s an example of some feedback that is both positive and constructive:

Read: 5 Tips for Gathering Feedback the Right Way
47. Collaborate With Others
If you’re a solo-producer then you’ll know that it’s easy to get stuck in your ways.
You might have a lot of bad habits that haven’t come to light because you haven’t seen anyone else work.
Collaborating with other producers is a great way to pick their brains and find out some of their techniques. Whether it’s in person or over the internet, it’s something that I recommend everyone does!
48. Visit Pensado’s Place
Though this website is more aimed at the mix engineers compared to producers, it doesn’t mean you won’t get anything out of it.
In fact, you’ll get loads out of it – there are interviews with highly regarded mix engineers, ‘in the studio’ type videos with Dave Pensado, and a lot more.
49. Read & Watch
Apart from our mixing articles, there is a ton of good books out there that can help you with your mixing, I’ve listed a few below:
- Mixing Secrets for the Small Studio
- The Mix Engineer’s Handbook
- Mixing Audio: Concepts, Practices, and Tools
Not much of a reader? Check out a video course instead.
Also, The Pro Audio Files has a bunch of great articles on mixing. Including this article on 6 of the best saturation plugins (with tips on how to use ’em).
50. Practice
Haha, you thought you’d avoided that word, didn’t you?
Nope, practice is the vital ingredient in all of this. Mix, mix, and mix again.
I mean, I can’t tell you how to practice… You’ve gotta go do it!
A Final Word
There you have it. 50 tips on mixing.
If you’re left a bit confused, I’d recommend you check out our newer article on mixing EDM for beginners. These tips are great, but only if you nail the fundamentals first (which that article will help with).
If you enjoyed this article, or it helped you in any way – I’d love it if you could leave a comment with your thoughts and share it around!
New Producer?
EDM Foundations is the course for you.
It’s simple, to-the-point, and action-oriented. You won’t spend hours trawling through dry theory videos, you’ll be learning as you go.
By the end of the course, you’ll have finished 4 songs, including one original that you can share with family, friends, and the world.
