


Future house is one of EDM’s most popular genres right now.
But how on earth do you make it?
In this article, we dive into 36 practical tips from professional future house producers.
Truth & Lies
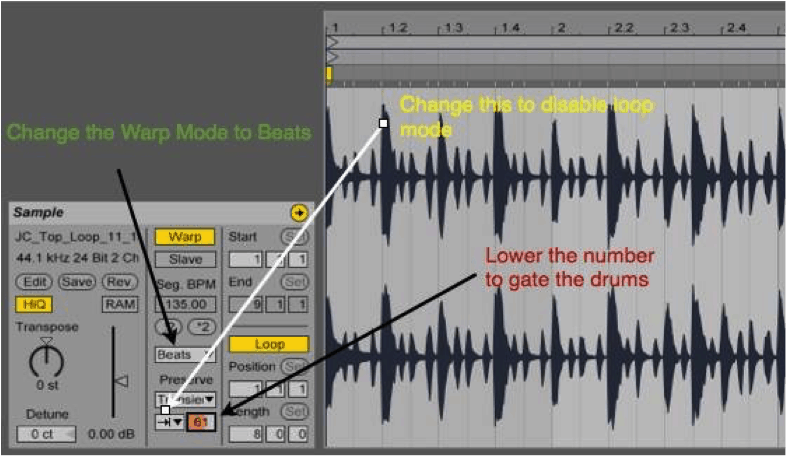
 Tip #1 – Drum tightening
One our absolute favorite tricks in Ableton is something we call the “NGHTMRE trick”, as we learned it from watching a NGHTMRE Q&A. We use this in all our tracks and it is invaluable for tightening up drums.
- Double click on your drum loop and go to the Warp section.
- Change the first drop down menu to Beats, and the second drop down menu to Transients.
- Make sure the icon shows the one arrow pointing to the right (see example below), then lower the amount in the little yellow bar (transient envelope).
As you lower the envelope, you will hear that the transients get shorter and shorter, giving the drums a crispier sound. Lowering it too much will make the drums sound chopped off, so make sure you find the golden area. This effect also works on one-shots and one shot samples.
Tip #2: Low cut (pretty much everything) & saturate
Two basic effects that go on the majority of our tracks are the EQ and the Saturator. We typically cut the low end out of anything that isn’t directly supposed to be in that range, which is the bass and sub. Using this technique on all your tracks and instruments will make your mix sound clean and mud-free. You’d be surprised how much low end rumble all your drum samples have! Our second go-to effect is the saturator. This is a fantastic tool for bringing sounds and instruments to life. The saturator creates harmonic frequencies, giving the track a thicker, more colorful sound. Throw it on a track and mess around with the drive, clip curve and dry/wet to get a feel for what it can do. Not every sound needs a saturator on it though, use your ears and judge whether the sound is full enough as it is.
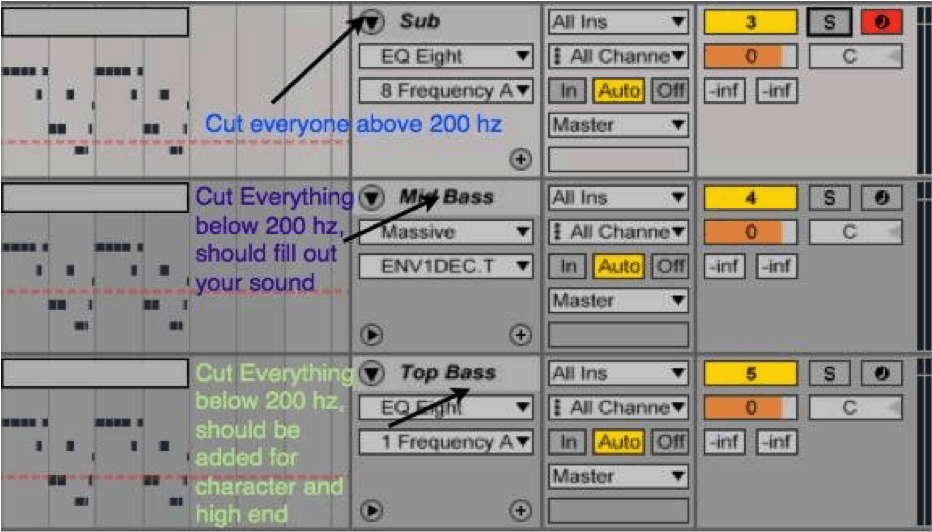
Tip #3: Layer your basses
Layering basses has many advantages compared to just using one sound. Most importantly, this technique will create harmonies and add frequencies to the mix that might otherwise be lacking. In our productions, we usually have between two and four bass layers, consisting of the sub, main bass, and other layers. We even layer real bass sounds with synth sounds. The most important thing is that each layer has it’s own frequency niche and that you low cut the higher frequency basses at around the same range that you high cut the sub.
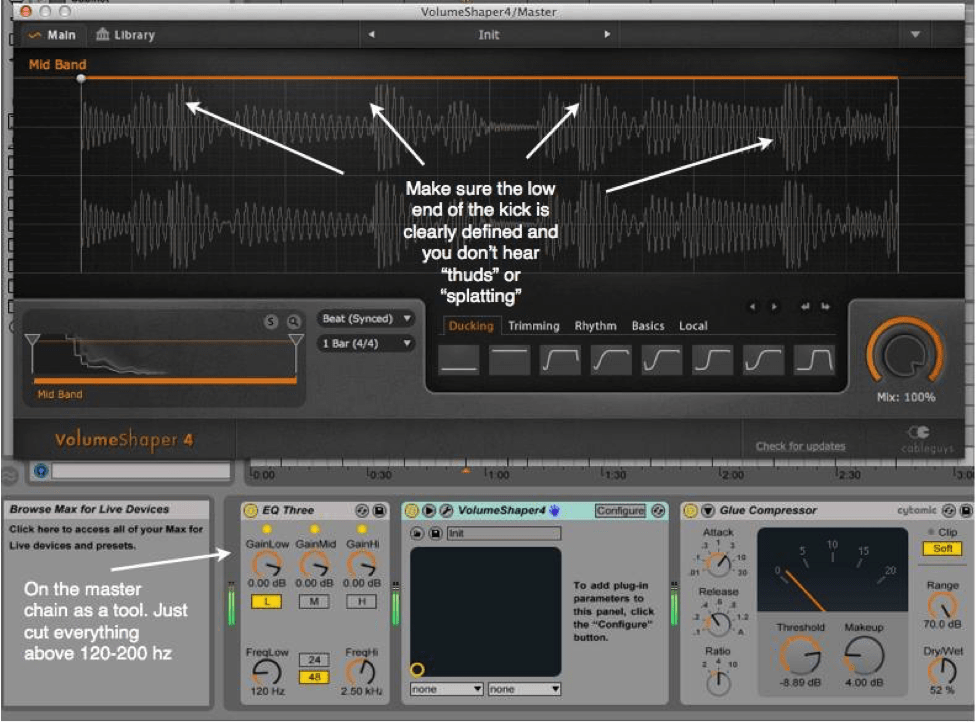
Tip #4: Sidechaining
One of the most important techniques used in deep/bassline house is low end sidechaining. Using plugins like VolumeShaper, Kickstart or LFO Tool are great for trying to match the contour of the kick to the bass. The way we check our low end is by putting an EQ on the master channel and cutting everything above 120 hz. Then, put VolumeShaper on the channel as a visual aid to see if the kick changes every time it hits. This way you are isolating and listening to just the kick and sub to make sure there isn’t any “splatting”.
Tip #5: Keep your low end mono
We often hear tracks that have a very wide stereo low end at 200z or less. It is very important to keep your low end (below 200hz) in mono. Many club systems will automatically make the low in your track mono, which can cause phase cancellation and make your track not hit as hard. We put a M/S EQ on our master channel, usually rolling off all of the sides at 200-240 hz. More importantly, make sure that all of your subby kicks and sub bass is in mono, as well as any bass sounds below 200hz.
Follow Truth & Lies on Facebook
Shaun Frank

Tip #6: Focus on the ideas
Good production can’t make a bad song good, the musical idea is the most important part. Before sound design etc, make sure you’ve got great songwriting, hook writing, etc.
Tip #7: Keep it simple
I think the key to great production is simplicity. Don’t over do it. The space in the mix is just as important as the sounds. Rather than layering and layering, spend your time finding one great sound. And be careful with layering a bunch of reverbs. It helps early in the process to make things sound more “finished”, but it’ll kill you in the mix. I tend to use reverbs on sends, so that I’m generally sticking to one or two reverbs per session, and I send my different instruments and vocals to those specific reverbs. I really love the EMT and Lexicon Reverbs from UAD.
Follow Shaun Frank on Facebook
Oliver Heldens

Tip #8: Use the right stuff
With music it’s all about the right elements together. I actually don’t have a lot of stuff on the different channels it’s basically just EQ, reverb, and sometimes the camel phat on it. For me it’s all about about finding the right combination so I make a lot of different options of sounds and patterns and I experiment a lot. Sometimes I’ll have like 30 massives and 50 sylenths but I’ll only use 4 of them because the rest of them didn’t work out.
Note from Sam: experimentation is super important. You don’t have to get the right sound straight away. Try to purposely add too many instruments and then carve out what’s important afterwards.
Tip #9: Use your ears
There are no secrets to get your tracks better. There’s no special knob – it’s all about your ears.
Source: Oliver Heldens Shares His Top Production Tips – (Turn Up The Bass) < strong>Follow Oliver Heldens on Facebook
Robby East
 Tip #10: Use sends for versatility
When adding reverb and delay, always use a send track instead of putting the effect directly on the channel. This saves a lot of CPU and gives you the freedom to edit the wet effect signal with an EQ or side chain for example without affecting the original dry signal.
Tip #11: Parallel distortion
For synths I like to use parallel distortion to give them more power without distorting the original signal so much that it loses its character, this is also done with a send track.
Tip #12: Match EQing
Look into match EQ’ing, it’s a standard plug-in in Logic, but there are alternatives for other DAW’s. Basically it’s an EQ that compares a signal with another signal and matches it or does the opposite. This is useful for mastering: it can compare your master signal with that of a finished, well produced track and it boosts the frequencies it’s missing compared to the other track. Also useful for kick and bassline EQ’ing: it compares your kick with your bassline and then cuts the frequencies of your bassline where the kick is the most present or the other way around.
USB Players
 Tip #13: Alternative sidechain methods
Instead of sidechaining instruments to your bassdrum using a compressor, try plugins like Cableways VolumeShaper. You can use the two bands to heavily duck the deep frequencies (Below 150 Hz) while keeping the top end unprocessed or just slightly effected.
Tip #14: Use good source material
Use good samples from the start and don’t try to tweak poor samples into usable ones.
Note from Sam: This is super important. It’s easy to get stuck in the trap of tweaking and processing, which creates the illusion that your doing something productive. If you pick good samples and sounds at the start, you shouldn’t need to spend a lot of time on tweaking them.
Tip #15: Create a favorites library
Build yourself a “favorite samples“ library where you keep all your favorite drum and instrument sounds. This helps to get going faster without endlessly searching for the right samples to start with.
Follow USB Players on Facebook
Aberci

Tip #16: Be inspired
Music is all about emotions. You have to be in the right mood. Take breaks while you are mixing and of course, try not to spend more than three days to compose your song. Note from Sam: Many producers might find that last part controversial, but I think it’s valuable advice. It might take more than three days to produce the full song, but if you’re struggling to get the core ideas down in a few days, it might be worth moving on.
Tip #17: Finish everything
Try to finish all your started projects. If they don’t sound good, get rid of them. If you have a good idea, you have to work hard to finish it.
Note from Sam: If an idea excites you at the beginning, it’s worth finishing even if you experience a “block” later on. Soldier through and finish it. Lower your standards if you need to. Your development as a producer is directly correlated to how much music you finish.
Scissors
Tip #18: Reference on different systems
It’s awesome when your track sounds good in your studio with acoustic treatment and big studio monitors. But don’t forget that most of your listeners use mobile phone headphones or laptop speakers. Always check your track on different sources.
Jonas Aden

Tip #19: The “box” approach to mixing
You need to think of the mix as a 3D box. To get it sounding as full as possible, you need to fill up the box as best as you can. This means molding all the individual timbres together for it to sound unified. You need to use all the space you got, the right, the left, the mono. With volume-leveling and reverb/delay you can fit the sounds from the front to the back and top to low. With EQ and sound-selection you can fit them where you want in the box. Here it’s important to make the sounds fit together, most of my sounds sound horrible in solo but together they work well. As an example the main lead in the Secrets remix is made off of 8 layers, which all take up very little space, everything unnecessary is taken away and they combine up to become quite fat if I can say so myself (note: you don’t always needed to layer this much, often just two or three sounds can be more than enough. If it sounds good, it is good).
Tip #20: Sound selection
Sound selection is very underrated, the sounds need to compliment each other and not muddy and/or cancel out each-other.
Tip #21: Less compression
I rarely compress individual elements, the compression I do on single elements come from the form of distortion mostly, and then I compress buses for instance of synths, drums (ex. kick) etc. I’ve found synths rarely need compression (if not for creative purposes and multiband-compression), I’ll compress live-instruments and sometimes drums if I feel it’s needed, but the busses are essential to glue the track together, as well as using one or two reverbs for the whole track.
Tip #22: Look at your project holistically
So essentially, what I feel like a lot of producers could benefit greatly from is not getting lost in the details but see the track in a more holistic way. Bonus tip is bouncing the project out to stems and opening it in a new project, which often gives a better idea of how I want the track to sound and gives me a clear vision and control on how to do just that.
Cooperated Souls
 Tip #23: Make your synths have more attack
What I always do for having crispy synths is adding an extra Synthesizer like Sylenth1, which I edit with an modulation envelope on the pitch. I adjust the pitch-modulation envelope and turn the decay a small bit up(only the decay, I leave the other buttons untouched). The same goes for the main volume envelope, I put the decay only a bit up over zero so the only thing you will hear when you play a note is a small attack sound. After that you copy the midi notes of your main melody and paste that in the ‘attack-synth’ channel. Adjust the main volume of the synth to your preference and you’ll notice big difference in power and crispness.
Tip #24: Overcome writer’s block
Having no inspiration sucks, unfortunately everyone will get it when making music. What I always do is producing other music genres for a while, hip-hop for example. Not only will it greatly benefit your overall production skills, it is also very fun to do and helps you to think more out of the box.
Tip #25: Create big, powerful pianos
When I want to make a wide and powerful sounding piano, I always add 3 layers: a Korg M1 for the high part of the piano (this will make it sound bright and powerful), A grand piano for the main body (great VST’s for this are true pianos and pianissimo) and some strings that will play the same melody two to three octaves higher, this will make the piano sound really clear. You will need to give every layer a different mixer track, the crispy piano needs an EQ where you put completely cut out the low end, and put the mid down a bit so it will not clash with the other piano. You will need to cut out the low frequencies for your grand piano too, so it will not clash with your bass, leave the mid-section untouched and put down the high frequency’s a bit. The strings should be very low in volume, you only need to hear them slightly at the background, the main focus lays on your piano’s. After that I Route all mixer-tracks to a send channel where I add an stereo enhancer to make the sound more wide and I glue the sounds a bit more together using compression. Finally, I side-chain it to give it more groove.
Tip #26: Leave headroom
To get a clear mix I always make sure that the master does not touch the red when all master plugins (like limiters for example) are turned off. I always let the kick hit maximum -4Db and make sure that all my other sounds hit -9/-8 db at max. This allows your mix to have some headroom left, which will your mix overall sounds better.
Follow Cooperated Souls on Facebook
DeBoer
 Tip #27: Write on actual instruments
Try writing on organic instruments if possible. I find a lot of my best work comes when I sit with my guitar or piano to play around with melodies. When you have a melody in your head and your trying to put it straight into midi sometimes it can get lost in the process.
Tip #28: Leverage presets for faster workflow
Create presets for everything. Eg. I have presets for my EQ which cut at 35, 100, 250 and 500. This saves a lot of time when you can just slap on an EQ as soon as your playing around with sounds. Once you get into the mixing process you can fine tune everything a little more but this saves time and lets you focus on the writing then the production in the early stages.
Tip #29: Learn theory
Learn theory as much as possible. I don’t mean just key signatures but learn different chord structures, different scales then just major or minor such as melodic minors or harmonic minor etc. After you learn the basics keep digging there is always more theory to be learned.
Tip #30: Use velocity
Fool around with velocity, especially on percussion to add a more human touch. For a long time I’d leave velocities all the same and it made a world of difference once I started playing around with them. You can even add different midi velocity effects inside of ableton that automatically varies the velocity.
Rich James
 Tip #31: Strategies for beating writer’s block

There are quite a few strategies I use to overcome writer’s block. One is going on a night out clubbing with some friends. When you’re in the club just relaxing, having a drink, partying, I really get the chance to listen to what music is being played, seeing what music people ‘vibe off’ and groove to. I really go home with a lot of inspiration the next day. The worst thing you could possibly do is try to force ideas by sitting at your computer frustrated at the fact you have writer’s block. Go away from it, chill out, relax. Inspiration hits us at the strangest of times and everyone is different. So I guess really all the techniques I use are just taking a small break from production to chill out, watch a movie, see friends/family. Everyone needs time to recover, as producing music is very tiring, mentally.
Tip #32: Noise stab before kick drum
This is actually a tip that I picked up from Tom Staar a while ago. I have a sharp burst of white noise, very attacky – almost like a pluck, play just before the kick drum hits. It is barely noticeable if you tune the white noise to the same pitch as your kick drum and make sure the volume levels are balanced between the two. But this is a very effective little method that really helps the kick drum cut through the mix. Especially if you are using a lot of different sounds.
Snowmass
 Tip #33: Advanced sidechain compression
I see a lot of guys on here covering basic sidechaining, which is so important. I’m going to try to dive one step deeper to mix things up – pun intended. My favorite new sidechaining device is the Wavesfactory Trackspacer. This bad boy is a multiband sidechain compressor, which means that you can focus in on a section of freq to remove when your kick hits (obviously at least the low end). This way, you can really have your kick and bass fit together without having to always compress oyur bass’ higher frequencies. Also, sidechain your reverbs to create headroom (look up the Dada Life goons’ tutorial on that).
Tip #34: Group tracks that have similar frequencies
After I’ve treated each track individually, I always group my tracks (percussion, basses, synths, etc). This way, you can treat the group as a stem and work on gluing everything together more. I often EQ, glue compress, and slightly sidechain my groups to mold everything together a little more.
Tip #35: Start with high quality samples
We all know the saying, “you can’t polish a turd.” Invest in the best samples and then manipulate them with plugins (or don’t ;)). And with that being said, make sure that each sample/track stands out using panning/stereo imaging. Keep the low-end mono, but make sure your have some movement and width up top.
Tip #36: Don’t mix with a mastering chain on your master channel
However, I learned some tricks from my buddy, Hyperbits, which requires automation on the master channel. Use a stereo imager, reverb, EQ, and the master fader to create bigger drops. Automate a single band to make the track more mono as your drop builds on the stereo imager. Similarly, automate a high pass filter, increase a reverb’s dry/wet, and drop your master gain 1-2dB while your drop builds. Then, turn everything off when your track drops to make that puppy sound as big as can be.
Before you go…
I hope you enjoyed the tips! Make sure to check out the artists featured and their music.
